Buy balloons on Amazon (paid link):
Buy an air pump on Amazon (paid link):
Inflate a balloon leaving a seven—inch flat tail (Pic 1).
We are going to twist a chain of seventeen bubbles to make the heart. We twist all bubbles of the same size: up to one and half—inch. We also can make the first four and the last four bubbles up to two—inch. Then the rest nine bubbles could be as small as a half of inch. Twist the first bubble (Pic 2).
Twist the second bubble (Pic 3).
Twist the third bubble (Pic 4).
Twist the fourth bubble (Pic 5).
Lock both ends of the chain of the first four (the first through the fourth) bubbles in one lock twist (Pic 6). This step is marked with arrows between points A and C on the scheme.
Twist the fifth bubble (Pic 7).
Twist the sixth bubble (Pic 8).
Twist the seventh bubble (Pic 9).
Twist the eighth bubble (Pic 10).
Twist the ninth bubble (Pic 11).
Twist the tenth bubble (Pic 12).
Twist the eleventh bubble (Pic 13).
Twist the twelfth bubble (Pic 14).
Twist the thirteenth bubble (Pic 15).
Twist the fourteenth bubble (Pic 16).
Twist the fifteenth bubble (Pic 17).
Twist the sixteenth bubble and the rest of the balloon is the seventeenth bubble-it happens only if you measured all bubbles properly (Pic 18). Otherwise (that’s the regular case) you have to twist the seventeenth bubble and cut off the rest of the balloon.
Lock both ends of the chain of the last four (the fourteenth through the seventeenth) bubbles in one lock twist (Pic 19). This step is marked with arrows between points H and F on the scheme.
Force the chain of six (the fifth through the tenth) bubbles through the loop of the first four (the first through the fourth) bubbles and lock the free end of the tenth bubble between the second and the third bubble (Pic 20). This step is marked with arrows between points B and E on the scheme.
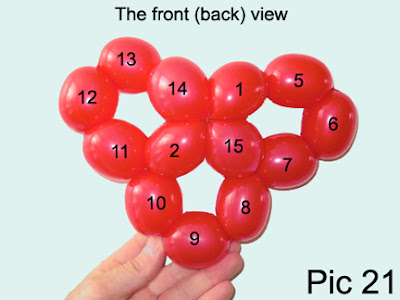
Force five (the first, the fourth, the fifth, the sixth and the seventh) bubbles through the loop of the last four (the fourteenth through the seventeenth) bubbles. Lock the free end of the seventh bubble between the fifteenth and the sixteenth bubbles (Pic 21 through 24). This step is marked with arrows between points G and D on the scheme. Congratulations, you have made the heart.
It’s very simple to make a square shape once you learn to make the heart described above. To make the square shape you twist twenty bubbles of the same up to one—inch size. The first seventeen bubbles we use to make the heart as described above. And the rest of the balloon we use to make three more bubbles (Pic 25).
Twist the eighteenth bubble (Pic 26).
Twist the nineteenth bubble (Pic 27).
Twist the twentieth bubble (Pic 28).
Lock both ends of the chain of the last sixteen (the fifth through the twentieth) bubbles in one lock twist. The rest of the balloon is the twenty—first bubble (Pic 29).
Cut off the twenty—first bubble and tie off the end. Congratulations, we have made the square shape (Pic 30 and 31).
We can use this square as a part of bigger sculpture or just to make a nice sugar free zero cholesterol mini cake. The square has four corner bubbles: the sixth, the ninth, the twelfth, and the nineteenth bubbles. We have to lock both ends of each corner bubble in one lock twist. Lock both ends of the sixth bubble in one lock twist (Pic 32).
Lock both ends of the ninth bubble in one lock twist (Pic 33).
Lock both ends of the twelfth bubble in one lock twist (Pic 34).
Lock both ends of the nineteenth bubble in one lock twist. We have made the square base for the mini cake (Pic 35 and 36).
We are going to use a white balloon to make the brim of the cake and the candle. Inflate the white balloon leaving a six—inch flat tail (Pic 37).
Lock the knot of the white balloon with the sixth pink bubble (Pic 38).
We are going to twist a chain of twelve bubbles to make the brim around the square. We twist all brim bubbles of the same up to one—inch size. Twist a chain of three (the first through the third) white bubbles (Pic 39).
Lock the free end of the third white bubble with the nineteenth pink bubble (Pic 40).
Twist a chain of three (the fourth through the sixth) white bubbles (Pic 41).
Lock the free end of the sixth white bubble with the twelfth pink bubble (Pic 42).
Twist a chain of three (the seventh through the ninth) white bubbles (Pic 43).
Lock the free end of the ninth white bubble with the ninth pink bubble (Pic 44).
Twist the chain of the three (the tenth through the twelfth) white bubbles (Pic 45).
Lock the free end of the twelfth white bubble with the sixth pink bubble (Pic 46).
Cut off nicely the rest of the white balloon (Pic 47).
Tie off the end of the white balloon. We can use the part of the white balloon to make the candle (Pic 48).
Attach the candle in the center between bubbles of the cake (Pic 49 through 52). We have made the cake with flat brims.
We can arrange the white bubbles of the brim on the top of the cake to make a basket shape cake (Pic 53 through 56). Congratulations, you have made the heard, the square and the mini cake. Have fun and happy twisting :)


No comments:
Post a Comment