

Buy balloons on Amazon (paid link):
Buy an air pump on Amazon (paid link):
We are going to make a spider. Spider sculptures are very popular during the Halloween season. That is why I use Halloween colors: orange, black, purple to make them. Of course we can use different color balloons as well. Inflate four purple balloons leaving about one-inch flat tail (Pic 1).

Squeeze the balloon forcing the air inside to the end of the flat tail. We are going to use one balloon to make a pair of spider legs (Pic 2).


We have made six legs. We can leave them as it is or improve them a bit. Fold a leg in half (Pic 5).

At the middle of the leg we twist and lock both ends of about two—inch bubble. We do it in one move. Work one leg at a time. It is kind of a knee bubble. This bubble helps to keep the leg in a fixed position (Pic 6 through 9). How many legs do spiders have? I've received so many different answers for this question. Usually, I make as many legs as I am told. Sometimes, especially little kids, like to have a spider with two legs and two arms. Usually it means that they want Spiderman. We are fine with that! Here are links to instructions: Spiderman 1 and Spiderman 2 and Spiderman 3. So far we have made six legs.


Let's make one more pair of legs. These are the front legs (Pic 10). Or maybe we should call it arms?

Let’s make the body. Inflate an orange balloon leaving about one-inch flat tail (Pic 11).

We are going to twist five bubbles. The first four bubbles we twist are the same size—one quarter of the balloon. Let's twist a chain of the first (the first and the second) bubbles (Pic 12).

Lock both ends of the chain of the first two (the first and the second) bubbles in one lock twist (Pic 13).

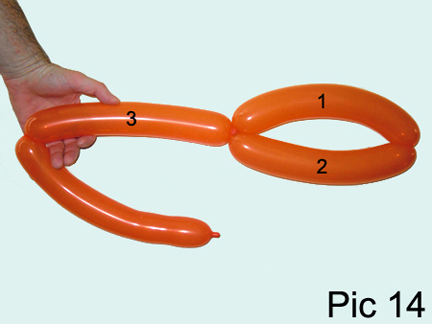
Twist the third bubble (Pic 14).
Lock the free end of the third bubble between the first and the second bubbles (Pic 15). Basically we just have made the simple three fold hat.

Twist the fourth bubble. Make sure to make the fifth bubble of any size (Pic 16).

Lock both ends of the chain of the last two (the third and the fourth) bubbles in one lock twist (Pic 17 through 19). We have made the body. The fifth bubble represents the head.


Force three legs through the loop between one bubble and the set of three bubbles of the body (Pic 20 and 21). Make sure to put three legs on each side of the body.


Force the fourth pair of legs in front part of the body (Pic 22 through 25).


We can keep the head bubble as it is, just draw the face. I personally like to use a different color balloon to make the eye bubble. In this example I used a black balloon. Twist a chain of two soft about one-inch bubbles. Lock all ends of two bubbles in one lock twist. Cut off the rest of the black balloon. We have made the eye bubbles (Pic 26).

Attach the the eye bubbles between the head and the body bubbles. Fix the eye bubbles on a top of the head (Pic 27 through 29). Congratulations, we have made the spider.


Use a permanent black marker to draw the face (Pic 30).

Let's use different color balloons to make one more spider. In this example I use orange balloons to make the legs. And I use a black balloon to make the body. I think it is a bit easier and faster to attach legs to the body if we just place the legs between bubbles of the body right before we lock the fourth bubble of the body (Pic 31 through 33).


Lock both ends of the fifth bubble (the head) in one lock twist (Pic 34).

Prepare the fourth pair of legs (Pic 35).

Force the fourth pair of legs in the front part of the body (Pic 36).

This time I am going to use a white balloon to make the eye bubbles (Pic 37).

Attach the eye bubbles between the head and the body (Pic 38). Use a permanent black marker to draw the eyes.

Congratulations, we have made the second spider (Pic 39 through 41).


We can attach legs to the body in a different ways. In this example I made the top and bottom of the body of two bubbles (Pic 42 through 45).


Attach the fourth pair of legs to the body. Use a permanent black marker to draw the face (Pic 46).

Congratulations again, we have made a spider (Pic 47 through 49). For extra fun: place the spider on a sidewalk when the wind is up to 10 miles. The wind will push the sculpture. It creates an illusion that spider moving on its own. Have fun and happy twisting :)


No comments:
Post a Comment