Buy balloons on Amazon (paid link):
Buy an air pump on Amazon (paid link):
Today we are going to make a body that can be used for many different cartoon characters, animals and so on. I am going to use a red balloon to make a body for Santa Claus. Inflate a balloon leaving about three-inch flat tail (Pic 1).
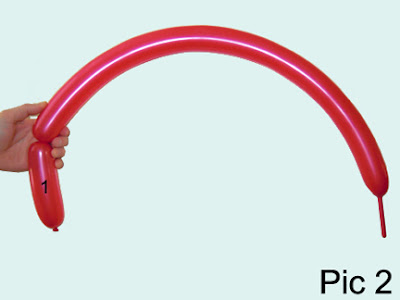
We are going to twist six bubbles. The first and the sixth bubble we twist to make arms. Twist the first about five-inch bubble (Pic 2).
Squeeze the balloon to make it very soft. Make sure to leave a very little about half-inch flat tail at the end of the balloon (Pic 3).
Twist the second soft about six-inch bubble (Pic 4).
We can twist bubbles in regular order, though for this sculpture I like to twist bubbles in pairs. This way it is faster and more accurate. So, let's fold the balloon in half and twist the sixth about five-inch bubble at the very end of the balloon (Pic 5). It is the second arm.
Lock the first and the sixth bubble in one lock twist (Pic 6).
Measure the fifth about six-inch bubble. It should be the same size as the second bubble. Measure and twist the fifth bubble the same size as the second bubble and lock the free end of the fifth bubble with the free end of the second bubble (Pic 7).
Split the bubble between the second and the fifth bubble on two (the third and the fourth) bubbles (Pic 8). Ideally the third (or the fourth) bubble should be about one inch longer than the second (or the fifth) bubble. Also, we can twist the four (the second through the fifth) bubbles of the same size.
Lock the arms (the second and the sixth) bubbles between the third and the fourth bubble (Pic 9 through 11). Congratulations, we have made the body in the simplest form.
I am going to use a black balloon to make the simplest feet or shoes. Inflate the black balloon leaving about four-inch flat tail. We are actually going to use only part of the balloon. Twist a chain of two (the first and the second) about five-inch bubbles (Pic 12).
Lock both ends of the chain of the first two (the first and the second) bubbles in one lock twist. Twist a chain of the next two (the third and the fourth) soft about one-inch bubbles (Pic 13).
Lock both ends of the chain of the last two (the third and the fourth) bubbles in one lock twist (Pic 14).
Lock all ends of the four (the first through the fourth) bubbles in one lock twist. Cut off the rest of the balloon (Pic 15). We have made the feet or shoes. For this sculpture we also can use just one small bubble instead of two (the third and the fourth).
Attach the feet at the bottom of the body (Pic 16 through 18). I also fix the longest (the third and
the fourth) body bubbles on the front. We can use the body as it is. Just attach whatever head you want to the top of the body.
the fourth) body bubbles on the front. We can use the body as it is. Just attach whatever head you want to the top of the body.
We can improve the body by giving it an extra twist (Pic 19 through 21). Do you remember we have made all the bubbles soft? We actually did it just for this twist :) Hold all four body bubbles in one hand about one third away from the bottom of the body. At this point we, twist all four body bubbles in one move. The bottom part represents legs, and the top part represents the body. Again, fix the longest pair of the body bubbles on the front. And we can fix the arms in different positions by forcing it between bubbles of the body.
The sculpture will look better with hands. There are number of differently shaped hands we can make. For example let's twist a chain of four soft about one-inch bubbles (Pic 22). I also suggest to make very little flat part between each bubble.
Lock both ends of the chain of the five (the first through the fifth) bubbles in one lock twist. Cut off nicely the rest of the white balloon, we are going to use the rest of the white balloon to make the second hand (Pic 25 and 26).
Attach the hand to the arm (Pic 27). Congratulations, we have made a hand.
The simpler way to make a hand is to twist about four-inch bubble and lock both ends of the bubble in one lock twist. Congratulations, you have made the simplest hand (Pic 28).
Twist a chain of the next two (the second and the third) soft one-inch bubbles. Lock all ends of all bubbles in one lock twist (Pic 29). The last two (the second and the third) bubble we twist to keep the hand in fixed position.
As I have mentioned previously, I am going to use the body to make the Santa Claus. So, here I attach the Santa Claus head (Pic 32). We also can attach the head in different ways.
Force the neck bubble between the front bubbles of the body and lock the nozzle of the neck bubble between the body and the legs (Pic 33 through 36).
In this example I inflate balloon just to make about one-inch bubble. Wrap the balloon around the body bubbles to make a belt. The belt keeps the body bubbles together (Pic 40 and 41).
This time I use a head with very short neck bubble (Pic 42 and 43).
Congratulations again, we have made the body. And then we use it to make sculptures of Santa Claus and elf.
Have fun and happy twisting :)


.JPG)


.JPG)


No comments:
Post a Comment