

Buy balloons on Amazon (paid link):
Buy an air pump on Amazon (paid link):

.JPG)

The first two bubbles you twist to keep the skirt in a fixed position. Twist the first soft one—inch bubble (Pic 2).

Lock both ends of the first bubble in one lock twist (Pic 3). This step is marked with arrows between points A and B on the scheme 1.

Twist the second soft one—inch bubble (Pic 4).

Lock both ends of the second bubble in one lock twist (Pic 5). This step is marked with arrows between points B and C on the scheme 1.

Twist the third five—inch bubble (Pic 6).

Twist the fourth two—inch bubble (Pic 7).

Twist the fifth two—inch bubble (Pic 8).

Twist the sixth five—inch bubble (Pic 9).

Lock both ends of the chain of the last four (the third through the sixth) bubbles in one lock twist (Pic 10). This step is marked with arrows between points E and C on the scheme 1.

Twist the seventh five—inch bubble (Pic 11).

Twist the eighth two—inch bubble (Pic 12).

Lock the free end of the eighth bubble (point F on the scheme 1) between the fourth and the fifth bubbles (Pic 13 and 14). This step is marked with arrows between points F and D on the scheme 1.


Twist the ninth two—inch bubble (Pic 15).

Twist the tenth five—inch bubble (Pic 16).

Lock the free end of the tenth bubble between the first two bubbles of the skirt (Pic 17 through 19). This step is marked with arrows between points G and C on the scheme 1. The rest of the balloon is the eleventh bubble. You can keep the eleventh bubble or cut it off and tie off the end. We have made the skirt.


Let’s make the top of the dress. Inflate a balloon leaving three—inch flat tail (Pic 20).

Twist the first four—inch bubble (Pic 21). It’s the body.

The next two bubbles you twist to make the shoulders of the dress. Twist the second seven—inch bubble (Pic 22).

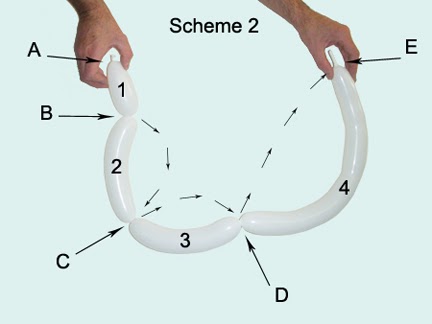
Lock both ends of the 2nd bubble in one lock twist (Pic 23). This step is marked with arrows between points B and C on the scheme 2.

Twist the third seven—inch bubble (Pic 24).

Lock both ends of the third bubble in one lock twist (Pic 25). This step is marked with arrows between points C and D on the scheme 2. The rest of the balloon is the fourth bubble.

Lock both ends of the fourth bubble in one lock twist (Pic 26 through 29). This step is marked with arrows between points D and E on the scheme 2. It is the mantle.


Now we are going to attach the top of the dress to the skirt. Lock the nipple/ knot of the white balloon (point A on the scheme 2) between the first two bubble of the blue balloon (Pic 30 through 34).


Attach the head bubble between the shoulder’s bubbles of the dress (Pic 36 and 37).


Force the arm pink bubbles in the loop of the shoulder bubbles of the dress (Pic 38 through 42). The arm bubbles should protrude just slightly from the loop of the shoulder bubbles. Fix all bubbles in proper positions. You have made the doll.


You can decorate the doll with a crown (Pic 43 through 47).


Congratulations, you have made a princess. You can cut off the bubble between hands of the doll to separate the arms of the doll (Pic 48).
Have fun and happy twisting :)
No comments:
Post a Comment