

Buy balloons on Amazon (paid link):
Buy an air pump on Amazon (paid link):

The scheme is for the butterfly wings only. I am going to use a clear yellow balloon to make the caterpillar. Then we make wings and attach them to the caterpillar to make the butterfly. We are going to make the caterpillar using a row of six tulip twists. Inflate the yellow balloon leaving a nine—inch flat tail (Pic 1).

Trim the knot (Pic 2).

Twist the first soft one—inch bubble (Pic 3).

Force the first bubble one—inch inside of the balloon (Pic 4).

Lock the first bubble inside of the balloon by twist the 2nd soft one—inch bubble (Pic 5). You made the tulip twist. The first bubble has two layers and it’s inside of the balloon!

Force the second bubble one—inch inside of the balloon then lock it by twisting the third soft one—inch bubble (Pic 6). The second bubble has two layers and now we have a chain of two (the first and the second) bubbles inside of the balloon.

Force the third bubble one—inch inside of the balloon then lock it by twisting the fourth soft one—inch bubble (Pic 7). The third bubble has two layers and now we have a chain of three bubbles inside of the balloon.

Force the fourth bubble one—inch inside of the balloon and lock it by twisting the fifth soft one—inch bubble (Pic 8).

Your next step could vary depending on what sculpture you want to make. First I am going to show how to make just a caterpillar. Force the fifth bubble three—inch inside of the balloon then lock it by twisting the sixth three—inch bubble (Pic 9). The rest of the balloon is the seventh bubble. The fifth bubble has two layers and now we have a chain of five (the first through the fifth) bubbles inside of the balloon.


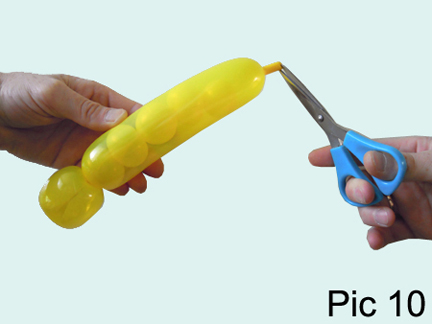
Use scissors to cut a little hole at the end of the balloon (Pic 10).
The sixth bubble stays outside of the balloon and it represents the head of the caterpillar (Pic 11). The rest of the bubbles represent the body. We have to deflate the 7th bubble.

You have to twist the body bubbles to force the air from the balloon. Start twisting bubbles in order from the fifth bubble to the first bubble (Pic 12 through 15). Hold all bubbles that you already twisted to prevent the air from going back.


Once you twisted all five bubbles there is little if not air at all in the 7th bubble (Pic 16). Each of the five first bubbles now has three layers that make them virtually indestructible. This sculpture could be used as handle (for swords, mugs and etc) or as a squishy toy.

Use a permanent marker to draw the face. Congratulations, you have made the caterpillar (Pic 17).

The caterpillar (and the butterfly) looks funnier with antennas. You can attach antennas when you twist the sixth bubble. Inflate the black balloon making two—inch bubble (Pic 18).

Split the black two—inch bubble on two bubbles. Force the second black bubble to the opposite end of the balloon (Pic 19).

Tie a knot in the middle of the black balloon to block the air flow between bubbles (Pic 20).

Put the knot in the middle of the black balloon next to the 5th yellow bubble (Pic 21).

Force the black knot and the 5th yellow bubble three—inch inside of the yellow balloon (Pic 22).

Lock the fifth yellow bubble and the black knot inside of the balloon by twisting the sixth yellow soft three—inch bubble (Pic 23). You can fix the sixth yellow bubble in any desirable position.

Cut a hole at the end of the yellow balloon (Pic 24).

Force the air from the end of the yellow balloon. Start twisting yellow bubbles in order from the fifth bubble to the first bubble (Pic 25 through 28). Hold all bubbles that you already twisted to prevent the air going back.


Use a permanent marker to draw the face (Pic 29). Congratulations, you have made the caterpillar with antennas.

Now you can add wings to the caterpillar to make a butterfly. Inflate the blue balloon leaving a four—inch flat tail (Pic 30). We are going to make two pairs of wings.

Twist the first nine—inch bubble (Pic 31).

Twist the second nine—inch bubble (Pic 32).

Lock both ends of the chain of the first two bubbles in one lock twist (Pic 33). This step is marked with arrows between points A and C on the scheme.

Lock both ends of the first (the second) bubble in one lock twist (Pic 34). This step is marked with arrows between points A and B on the scheme. We have made one pair of wings.

Twist the third soft three—inch bubble (Pic 35).

We split the rest of the balloon on two soft bubbles of the same size to make the second pair of wings (Pic 36).

Lock both ends of the chain of the last two (the fourth and the fifth) bubbles in one lock twist (Pic 37). This step is marked with arrows between points F and D on the scheme.

Lock both ends of the fourth (the fifth) bubble in one lock twist (Pic 38). This step is marked with arrows between points F and E on the scheme.

We have made the butterfly wings and the caterpillar (Pic 39).

Attach the first pair of wings (the first and the second blue bubbles) between the fifth and the sixth yellow bubbles (Pic 40 and 41).

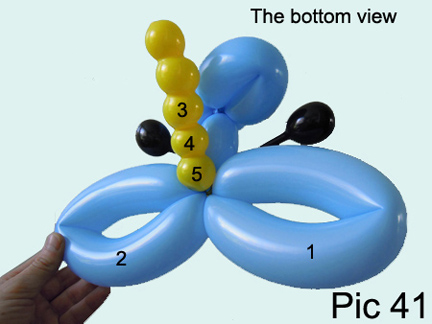
Attach the second pair of wings (the fourth and the fifth blue bubbles) between the third and the fourth yellow bubbles (Pic 42 and 43).


Lock both ends of the chain of two (the fourth and the fifth) yellow bubbles in one lock twist. At the same time you lock both ends of the third blue bubble in one lock twist (Pic 44 and 45). This step is marked with arrows between points C and D on the scheme. The fourth and the fifth yellow bubbles represent legs of the butterfly.


Congratulations, you have made the butterfly (Pic 46 through 50). Make these two sculptures to show how the butterfly evolves from the caterpillar. Have fun and happy twisting :)


This comment has been removed by a blog administrator.
ReplyDelete