Buy balloons on Amazon (paid link):
Buy an air pump on Amazon (paid link):
In previous instruction we made "Willy Wonka hat or vase out of balloons". And if you remember I mentioned then that we can make sculptures with different color patterns. Today I want to make similar sculptures with different color patterns using the same weaving technique. In this blog post I will show you how to make Uncle Sam hat. And in the video instruction related to this blog post I will show how to make a vase with different color pattern (you can find some pictures at the end of this post). Seen more color patterns in one instruction gives better understanding of what and how we can make.
I am going to use total of 14 balloons to make the hat (or vase). I will use the first two sets of six (three red and three white) balloons in each set to make the top (cylindrical) part of the hat. And the third set of two blue balloons I will use to make the brim of the hat (vase). Inflate the six red and six white balloons leaving about 10 - 11 cm flat tails (Pic 1).
I am going to work the sculpture starting from the top of the hat. Tie nozzles of three white and three red balloons in one knot (Pic 2 - 4). Alternate balloons by colors: red - white - red - white - red -white.
Twist one soft red (or white) about 3 - 4 cm bubble (Pic 5).
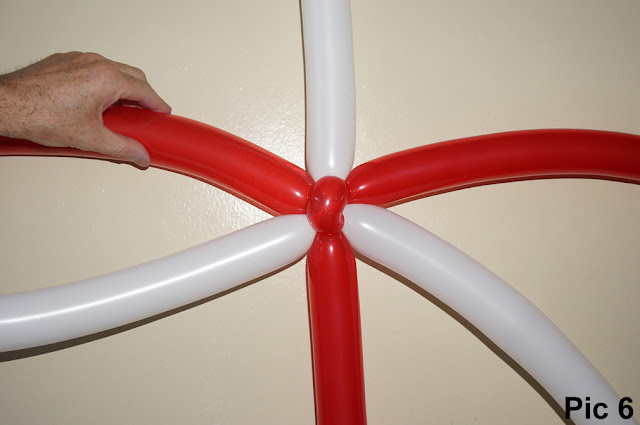
Lock both ends of this bubble in one lock twist (Pic 6). It is an additional bubble that helps to hide the knot at the top of the hat. We don't need the additional bubble for the vase. You can always hide it inside of the vase.
I am going to make bubbles of two sizes in each row: the large and the small bubbles. Work all balloons in the same way, moving around the sculpture in each row in the same direction. I want to make the the top of the hat wider than the base of the hat. Let's make the large bubbles of the first row of about 13 - 15 cm long. Make the small bubbles of the first row of about 3 - 4 cm long. Twist the first large bubble. Twist the second small bubble (Pic 7).
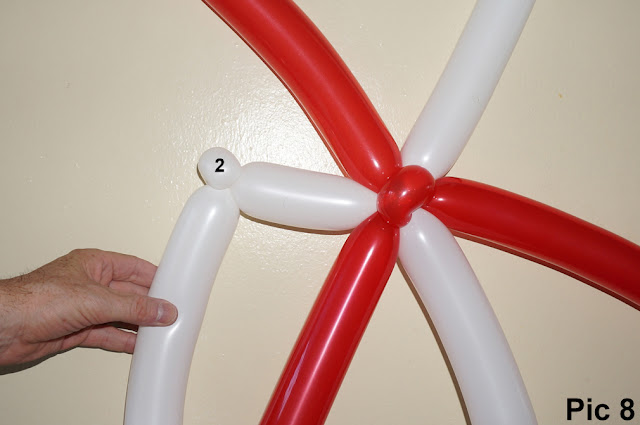
Lock both ends of the small bubble in one lock twist (Pic 8).
Work all six balloons of the first set in the same way (Pic 9).
Twist the third large white bubble (Pic 10).
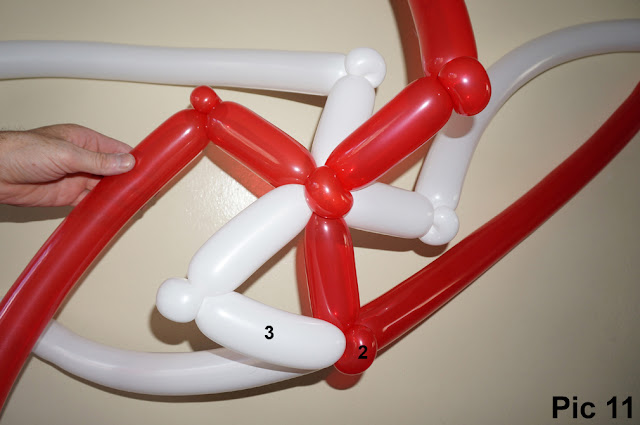
Lock the free end of the third white bubble with the second bubble of the nearest red balloon (Pic 11).
Work all balloons in the same way moving around the sculpture in the same direction (Pic 12 - 14). Remember to alternate balloons by colors. We have made the first row.
The top of the hat is made of six equilateral triangles.
Attach balloons of the second set to the first row of our sculpture. In this example I am going to tie nozzles of the white balloons of the second set to the small red bubbles of the first set (Pic 15)
Tie the nozzles of the red balloons of the second set to the small white bubbles of the first row (Pic 16 - 18).
We have three pairs of white and three pairs of red balloons alternated around the sculpture. Keep in mind that the same color balloons of one pair are interchangeable. To make taller hat you can use shorter balloon to make small bubbles and use long balloons to make large bubbles.
I am going to twist all small bubbles in each following rows of about 2 cm size. And I am going to decrease size of large bubbles in each following rows. Let's make the large bubbles of the second row of about 13 - 14 cm size. Twist the large red bubble. Twist the small white bubble of the nearest balloon on the right side from the red balloon. I am going to work all balloons moving around the sculpture in this direction (Pic 19).
Lock the free end of the large red and the small white bubbles in one lock twist. Twist the large white bubble. Twist the small red bubble of the next nearest balloon on the right side (Pic 20).
Lock the free end of the large white and the small red bubbles in one lock twist. Work all balloons in the same way around the sculpture. We have made the second row (Pic 21). And now we can see the color pattern: in one row the small bubble followed by the large bubble of the same color.
I am going to make all large bubbles of the third row of about 12 - 13 cm size. Find a small red bubble (there are three of them in the second row). Work this red balloon to make the large bubble. Twist the small red bubble using the nearest red balloon on the right (Pic 22).
Lock free end of the large red and small red bubble in one lock twist (Pic 23). Work all balloons in the same way moving around the sculpture in the same direction. We have made the third row.
I am going to make all large bubbles of the fourth row of about 11 - 12 cm size. Twist the red large bubble. Twist the white small bubble (Pic 24).
Lock free end of the large red and small white bubbles in one lock twist. Twist the large white bubble. Twist the small red bubble (Pic 25).
Lock free end of the large white and small red bubbles in one lock twist (Pic 26). Work in this way around the sculpture. We have made the fourth row.
I am going to make the large bubbles of the fifth row of about 10 - 11 cm size. Find the small white bubble (there are three of them) of the fourth row. Use this balloon to make the large white bubble. Twist the small white bubble using the nearest white balloon on the right (Pic 27).
Lock the free end of the large white and the small white bubbles in one lock twist. Twist the large red bubble. Twist the small red bubble using the nearest red balloon on the right (Pic 28).
Lock the free end of the large red and the small red bubbles in one lock twist. Work all balloons in this way moving around the sculpture in the same direction (Pic 29). We have made the fifth row. The color pattern is well defined. And from now you should have no problem repeating the same color pattern to make as many rows as you want.
I am going to make the large bubbles of the sixth row of about 9 - 10 cm size. Twist the large white bubble. Twist the small red bubble (Pic 30).
Lock the free end of the large white and small red bubbles in one lock twist (Pic 31).
Twist the large red and the small white bubbles (Pic 32).
Lock the free ends of the large red and the small white bubbles in one lock twist (Pic 33). Work in this way around the sculpture. We have made the sixth row.
I am going to make the large bubbles of the seventh row of about 8 - 9 cm size. Find the small red bubble (there are three of them) of the sixth row. Use this balloon to make the large red bubble. Twist the small red bubble using the nearest red balloon on the right (Pic 34).
Lock the free ends of the large red and the small red bubbles in one lock twist (Pic 35).
Work in this way around the sculpture. We have made the seventh row (Pic 36).
Let's make the eighth row the base of the hat. The base row should be appropriate size to fin on your head. In this example I have to increase size of large bubbles of the eighth row. Let's make the large bubbles of the eighth row of about 10 - 11 cm. Twist the large white bubble (Pic 37).
Twist the small red bubble (Pic 38).
Lock the free end of the large white and the small red bubbles in one lock twist (Pic 39).
Twist the large red and the small white bubbles. Lock the free end of the large red and the small white bubbles in one lock twist (Pic 40).
Work all balloons in this way around the sculpture (Pic 41). We have made the eighth row. It is the base of the hat.
Now I am going to make the small white soft about 3 cm bubbles of the brim. Twist a chain of two white bubbles (Pic 42).
Lock all ends of the last two small white bubbles in one lock twist (Pic 43).
Cut off the rest of the white balloon and tie off the end (Pic 44). Work all white balloons in the same way to make the small bubbles of the brim.
Cut off the rest of the red balloons and tie off the ends (Pic 45 and 46).
Inflate 2 blue balloons leaving about 8 - 10 cm flat tails (Pic 47).
Tie nozzle of the first blue balloon between any two small white bubbles of the brim (Pic 48).
I am going to make all bubbles of the first row of the brim of about 11 cm size. Twist the first blue bubble (Pic 49).
Lock the free end of the first blue bubble between the next two small white bubbles of the brim (Pic 50).
Work in this way around the sculpture to make the first row of the brim (Pic 51 - 53). Basically we already made the hat - if you like it with such a narrow brim.
I want to make the brim wider. Let's make the bubbles of the second row of the brim of about 13 cm size (Pic 54).
Work the rest of the first blue balloon to make as many bubbles as you can. Then cut of the rest of the balloon and tie off the end. Attach the nozzle of the second blue balloon where you ended the first blue balloon (Pic 55).
Work the rest of the second row of the brim in the same way. If you want you can make the brim wider by adding more balloons. I am going to stop here. Cut off the rest of the second blue balloon and tie off the end. Congratulations! We have made the Uncle Sam balloon hat (Pic 56 - 60). You can always turn the sculpture upside down and use it as a vase.
On the pictures below you can see how the hat looks like on me.
As I promised at the beginning of this instruction, below you will find pictures of the vase that I made for the video instruction (Pic 61 - 65). You can and welcome to watch the video. Here I want to point on the most noticeable differences. In this example I made the brim of the vase using three blue balloons, making total of three blue rows of the brim. The blue bubbles of the first row of the brim I made shorter than in the example with the hat (I am going to use this sculpture as a vase - it does not have to fit my head :) I made one small white bubbles of the brim between blue bubbles. The large bubbles of the first row are shorter than we made for the hat. And most noticeably, there is a different color pattern. I am confident that now you can make this color pattern. Don't be shy to make new color patterns! Have fun and happy twisting :)


No comments:
Post a Comment