

Buy balloons on Amazon (paid link):
Buy an air pump on Amazon (paid link):

I am going to work this hat starting from the top of the hat.Tie nozzles of all six blue balloons in one knot (Pic 2 and 3).


Let's make one soft about 3 - 4 cm bubble (Pic 4).

Lock both ends of this bubble in one lock twist (Pic 5). It is an additional bubble that I use to cover the knot at the top of the hat.

I want to make the top of the hat wider than the base of the hat. You can wrap a balloon around your head to measure the size of the hat. Divide this size on the number of bubbles (six in this example) in the base row. In this example I will have to make the bubbles of the row of about 9 - 10 cm long. We are going to work all balloons of the same set in the same way making bubbles of the same row of the same size. The top of the hat is made of six equilateral triangles. We have to make the first and the second bubbles of the first row of the same size. In this example I will make the the first and the second bubbles about 13 cm long. Twist the first and the second bubbles of the first balloon. Twist the first bubble of the second balloon (Pic 6).

Lock the free end of the second bubble of the first balloon with the free end of the first bubble of the second balloon (Pic 7).

Work all balloons in the same way around the sculpture (Pic 8 and 9). We have made the first row - the top of the hat.


Inflate all six purple balloons of the second set leaving about 12 cm flat tails (Pic 10).

Twist the first about 3 cm bubble (Pic 11).

Lock both ends of the first purple bubble in one lock twist (Pic 12). Work all balloons of the second (purple) set in the same way, making all bubbles of the same row of the same size.

We have to lock the first purple bubbles of the second set between the second blue bubbles of the first set (Pic 13 through 15).


I am going shape the hat by first decrease the size of large bubbles in each row. And then I will increase the size of large bubbles of each row. I am going to make the small bubbles in each row of the same about 2 cm size. Let's use purple balloons to make the large bubbles and the blue balloons to make the small bubbles. Twist the second purple about 11 cm bubble. Twist the third blue bubble (Pic 16).

Lock the free end of the second purple and the third blue bubbles in one lock twist (Pic 17).

Work all balloons of the same sets in the same way moving around the sculpture in the same direction (Pic 18 and 19). We have made the second row.


Twist the third purple about 9 - 10 cm bubble. Twist the fourth blue bubble (Pic 20).

Lock the free ends of the third purple and the fourth blue bubbles in one lock twist (Pic 21).

Work all balloons of the same sets in the same way moving around the sculpture in the same direction. We have made the third row (Pic 23).

Twist the fourth purple about 7 - 8 cm bubble. Twist the fifth blue bubble (Pic 23).

Lock the free ends of the fourth purple and the fifth blue bubbles in one lock twist (Pic 24).

Work all balloons of the same sets in the same way moving around the sculpture in the same direction. We have made the fourth row (Pic 25).

Twist the fifth purple about 5 - 6 cm bubble. Twist the sixth blue bubble (Pic 26).

Lock free ends of the fifth purple and the sixth blue bubbles in one lock twist. Work all balloons of the same sets in the same way moving around the sculpture in the same direction. We have made the fifth row (Pic 27).

You can work the sculpture in the same way to make as many rows as you want. I am going to make in this example all bubbles of the sixth row out of pink balloon. The pink balloon will represent the pink ribbon around the hat. Inflate the pink balloon leaving about 13 cm flat tail (Pic 28).

Tie the nozzle of the pink balloon between the purple and blue bubbles of the fifth row (Pic 29).

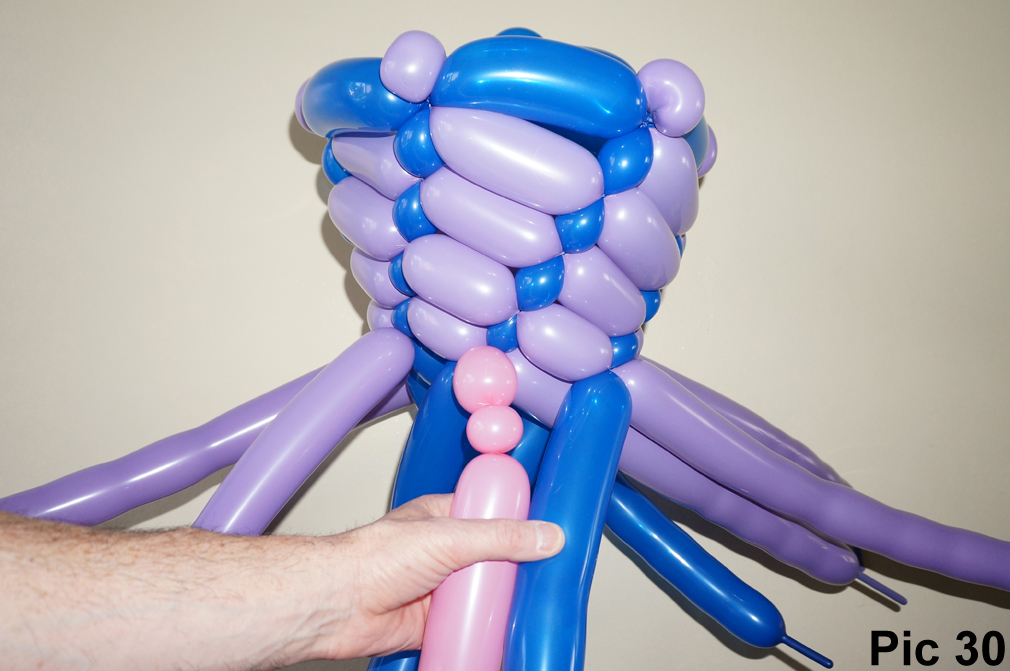
I am going to make in this example all large pink bubbles of about 4 cm size. And I will make all small pink bubble of about 2 cm size. Twist the large (first) pink bubble. Twist the small (second) pink bubble (Pic 30).
Lock the free end of the small pink bubble between the next purple and blue bubbles of the fifth row (Pic 31).

Squeeze the blue balloon to make about 1 -2 cm flat space between the last blue bubble and the rest of the balloon (Pic 32).

Force and lock the blue balloon between the pink bubbles. You have to rotate the small (second) pink bubble to wrap it around the flat space of the blue balloon (Pic 33).

Force and lock the purple balloon between the pink bubbles (Pic 34).

Twist the next large (third) pink bubble. Twist the next small (fourth) pink bubble (Pic 35).

Lock the free end of the small (fourth) pink bubble between the next blue and the purple bubbles (Pic 36).

Force and lock the purple balloon between the last two pink bubbles (Pic 37 and 38).


Force and lock the blue balloon between the last two pink bubbles (Pic 39 and 40). Work the rest of the sixth row in the same way.


Once you complete the sixth row you can cut off the rest of the pink balloon and tie off the end (Pic 41). We have made the sixth row. It is the ribbon in this example.

I am going to increase size of large bubbles in following rows. Remember: I give very approximately estimate sizes of all bubbles in all instructions. Use your own judgement!
Twist the sixth purple about 6 - 7 cm bubble. Twist the seventh blue bubble (Pic 42).

Lock the free ends of the sixth purple and the seventh blue bubbles in one lock twist. Work the rest of the seventh row in the same way moving around the sculpture in the same direction. We have made the seventh row (Pic 43).

I want to make the eighth row the base of the hat. It should be of appropriate size to fit your head. Twist the seventh purple about 9 - 10 cm bubble. Twist the eighth blue bubble (Pic 44).

Lock the free ends of the seventh purple and the eighth blue bubbles in one lock twist. Work the rest of the eighth row in the same way moving around the sculpture in the same direction. We have made the eighth row (Pic 45). It is the base of the hat. Make sure it fits you properly.

Now I am going to make the brim of the hat. We can shape the brim of the hat by changing the size of lager bubbles in the same row. I am going to work all large bubble of the same row of the same size (in the same fashion as we did previously). Twist the ninth blue about 12 cm bubble (Pic 46).

Lock the free end of the ninth blue bubble between the nearest two bubbles of the eighth row (Pic 47).

Work all blue balloons in this way moving around the sculpture (Pic 48).

Twist the eighth purple soft about 3 cm bubble (Pic 49).

Lock the both ends of the eight purple bubble in one lock twist (Pic 50).

Work all purple balloons in this way around the sculpture (Pic 51).

We can make the brim wider. Let's make the tenth blue about about 13 - 15 cm bubble. Lock the free end of the tenth blue bubble with the nearest eighth purple bubble (Pic 52). Work all blue balloons in this way around the sculpture.

I want to make the brim even wider! Let's twist the ninth purple about 15 - 17 cm bubble (Pic 53).

Lock the free end of the ninth purple bubble with nearest eighth purple bubble (Pic 54). Work all purple balloons in the same way around the sculpture.

We can make the brim even wider. I think the hat looks good at this point. Let's cut off the rest of the balloons and tie off the ends. Congratulations! We have made the Willy Wonka hat (Pic 55 through 58).


Here how the hat looks on me (Pic 59 and 60).


Below you may see me wearing variation of Willy Wonka hat that I made for video instruction (Pic 61 and 62). Link to the video is at the top of this post.


Below you may see an example of a vase (Pic 63 through 66). I made it taller than previous sculptures.


We can use the vase as a hat (Pic 67 through 69).


We can use the same balloon weaving technique to make different balloon sculptures of various shapes with different color patterns (vases, hats. dresses, skirts, bags and etc.). Have fun and happy twisting :)

No comments:
Post a Comment