Buy balloons on Amazon (paid link):
Buy an air pump on Amazon (paid link):
First of all many thanks to my facebook friend, amusing balloon twister and face painter Rita Tavares http://ritatavares3.blogspot.com/ (Blog) and http://tristarballoons.com/ (Website) who kindly shared this design originally created by Niko Fric. Rita also made very effective and easy to follow instructions for this sculpture. Thanks Rita! I have adapted this design and made instructions with some modifications: we are going to use five balloons instead of ten balloons as it appears in Rita Tavares original instructions. Keep in mind, less number of balloons makes the work rather more complicated! We are going to twist all bubbles of the same up to one—inch size. Inflate all balloons leaving an eight—inch flat tail (Pic 1).
Let’s start with a red balloon to make the frame of the heart. Twist a chain of fifteen bubbles (Pic 2 and 3).
Lock both ends of the chain of fifteen bubbles in one lock twist (Pic 4).
Cut off the rest of the balloon and tie off the end (Pic 5).
Inflate the yellow balloon leaving an eight—inch flat tail. Twist a chain of twenty bubbles and lock both ends of the chain in one lock twist. Cut off the rest of the yellow balloon and tie off the end (Pic 6).
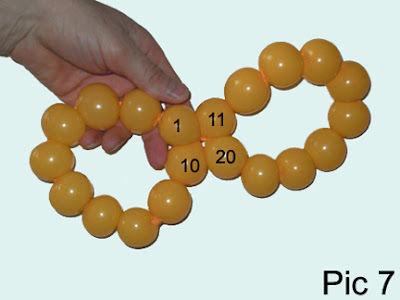
Lock both ends of the chain of the first or last ten yellow bubbles in one lock twist (Pic 7).
Inflate the blue balloon leaving an eight—inch flat tail. Twist a chain of twenty bubbles and lock both ends of the chain in one lock twist. Cut off the rest of the blue balloon and tie off the end (Pic 8).
Lock both ends of the chain of the first or the last ten blue bubbles in one lock twist (Pic 9).
Roll the chain of the first two (the first and the second) blue bubbles around the chain of the last two (the twentieth and the nineteenth) blue bubbles (Pic 10).
Inflate the pink balloon leaving an eight—inch flat tail. Twist a chain of twelve bubbles and lock both ends of the chain in one lock twist. Cut off the rest of the pink balloon and tie off the end (Pic 11).
Lock both ends of the chain of the first/last six bubbles in one lock twist (Pic 12).
Inflate the white balloon leaving an eight—inch flat tail. Twist a chain of six bubbles and lock both ends of the chain in one lock twist. Twist the seventh soft two—inch bubble. Later we are going to pop the seventh white bubble. Twist a chain of six bubbles and lock both ends of the chain of the last six (the eighth through the thirteenth) bubbles in one lock twist. Cut off the rest of the white balloon and tie off the end (Pic 13). We’ve made all the bubbles we need to make the heart. The front and the back of the heart will look the same.
Let’s start with red and yellow bubbles (Pic 14).
Lock the free end of the chain of two (the first and the second) yellow bubbles between the third and the fourth red bubbles (Pic 15).
Lock the free end of the chain of two (the eleventh and the twelfth) yellow bubbles between the first and the fifteenth red bubbles (Pic 16).
Now we are working on the back side of the heart (Pic 17).
Lock the end of the chain of the third and the fourth yellow bubbles with the end of the chain of the thirteenth and the fourteenth yellow bubbles. Just roll the chain of six (the fifth through the tenth) yellow bubbles around the chain of the six (the fifteenth through the twentieth) yellow bubbles (Pic 18).
Lock the free end of the chain of the eighth through the tenth yellow bubbles between the seventh and the eighth red bubbles (Pic 19).
Lock the free end of the chain of the eighteenth through the twentieth yellow bubbles between the eleventh and the twelfth red bubbles (Pic 20 and 21).
Now we are going to attach the blue bubbles (Pic 22).
Force the second red bubble in to the loop of the chain of four (the first, the second, the nineteenth and the twentieth) blue bubbles. Lock one end of the second red bubble between the nineteenth and the twentieth red bubbles. Lock the other end of the second red bubble between the first and the second blue bubbles (Pic 23 and 24).
Lock the free end of the chain of four (the eleventh through the fourteenth) blue bubbles between the sixth and the seventh red bubbles (Pic 25).
Lock the free end of the chain of four (the tenth through the seventh) blue bubbles between the twelfth and the thirteenth red bubbles (Pic 26).
Force the free end of the eleventh blue bubble between the first and the second yellow bubbles. Force the free end of the tenth blue bubble between the eleventh and the twelfth yellow bubbles (Pic 27).
Let’s fix the back of the sculpture (Pic 28).
Force the free end of the third blue bubble between the fourteenth and the thirteenth yellow bubbles. Force the free end of the eighteenth blue bubble between the fourth and the third yellow bubbles (Pic 29).
Let’s attach the pink bubbles (Pic 30).
Lock the ends of chain of the first/last six pink bubbles between the tenth and the ninth red bubbles (Pic 31).
Lock the free end of the chain of three (the seventh through the ninth) pink bubbles between the fourteenth and the fifteenth red bubbles. Then lock the free end of the ninth pink bubble between the fourth and the fifth blue bubbles. Lock the free end of the seventh pink bubble between the fifteenth and the sixteenth yellow bubbles (Pic 32).
Lock all free ends of all pink bubbles with closest bubbles. The right and the left side of the heart look the same. As well, the front and the back side of the heart (Pic 33 and 34).
Now it is time to pop the seventh white bubble and tie off the ends (Pic 35).
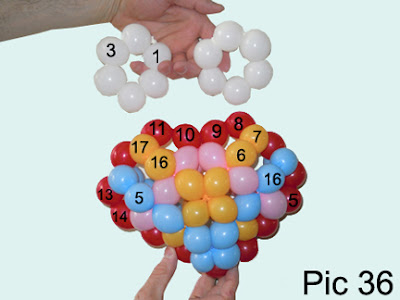
We have two separated chains of white bubbles (Pic 36).
Force the end of first white bubble between the tenth and the eleventh red bubbles. Then force the end of the third white bubble between the thirteenth and the fourteenth red bubbles. Lock all free ends of white bubbles with their nearest bubbles of other balloons (Pic 37).
In the same way we attach the second chain of six white bubbles on the other side of the heart (Pic 38 through 42). Congratulations, we have made the heart. Give a heart as a gift with a surprise gift in it! Yes, you can easily hide a little gift inside of the heart. Have fun and happy twisting :)
www.fewdoit.com
for you


.jpg)


No comments:
Post a Comment