

Buy balloons on Amazon (paid link):
Buy an air pump on Amazon (paid link):


We are going to make a small size hat for a doll. Inflate a three—inch bubble. We don’t want to make any knots on the top of the hat. That’s why we force the bubble away from the knot to the opposite end of the balloon (Pic 1).

Twist the first one—inch bubble (Pic 2).

Twist the second soft half—inch bubble. Twist the third soft half—inch bubble (Pic 3).

Lock both ends of the chain of the last two (the second and the third) bubbles in one lock twist (Pic 4). This step is marked with arrows between points A and C on the scheme 1.

Lock both ends of the second bubble in one lock twist. At the same time you lock both ends of the third bubble in one lock twist (Pic 5 and 6). This step is marked with arrows between points A and b on the scheme 1. Cut off the rest of the balloon and tie off the end. Congratulations, you have made the hat.


Below is an example of how you can attach the hat to a snowman. Lock the nozzle of the white balloon between bubbles of the hat (Pic 7 through 9).


Bellow you see an example of how you can make a hat using the tulip twist. For purpose of this instruction I am going to use a clear color balloon for the hat. Inflate the clear balloon making a six—inch bubble (Pic 10).

Tie together nozzles of the clear and the white balloon or just press the nozzle of the white balloon to the nozzle of the clear balloon with your finger (Pic 11 and 12).


Push nozzles of both balloons one inch inside of the clear balloon (Pic 13).

Hold both nozzles (they are one inch inside of the clear balloon) with your left fingers and twist the first one—inch bubble (Pic 14 and 15).


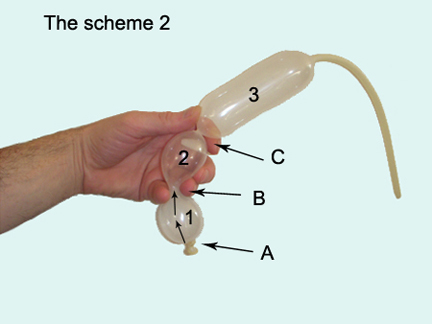
Hold your right index finger inside of the clear balloon. Pull your right index finger slightly out of the clear balloon. It brings the knot you have just made inside of the first bubble of the clear balloon. Hold the first clear bubble in left hand and pull your right index finger out (Pic 16). This step is marked with arrows between points A and B on the scheme 2.

You have made the tulip twist and attached both balloons (Pic 17).

Twist the second one—inch bubble of the clear balloon (Pic 18). The rest of the clear balloon is the third bubble.

Cut off the third bubble (the points C on the scheme 2) and tie off the end (Pic 19 and 20). There is a knot on the top of the hat.


That’s how this hat looks if you use a black balloon to make it (Pic 21 through 23). Congratulations, you have made the hat. You can use the technique described above to attach balloons to make any kind of joints (arms, legs and etc.). Have fun and happy twisting :)


No comments:
Post a Comment