
.JPG)
Buy balloons on Amazon (paid link):
Buy an air pump on Amazon (paid link):
In this instruction we are going to use basically the same body to make sculptures of different creations. Let's start with a dragonfly. Inflate a balloon leaving about two-inch flat tail (Pic 1).
.JPG)
Twist the first soft about one-inch bubble (Pic 2).
.JPG)
Lock both ends of the first bubble in one lock twist (Pic 3).
.JPG)
Twist the second about six-inch bubble (Pic 4).
.JPG)
Lock both ends of the sixth bubble in one lock twist (Pic 5). We have made one section of the body.
.JPG)
Twist the third about one-inch bubble. Twist the fourth soft about one-inch bubble (Pic 6).
.JPG)
Lock both ends of the fourth bubble in one lock twist (Pic 7).
.JPG)
Twist the fifth about six-inch bubble (Pic 8).
.JPG)
Lock both ends of the fifth bubble in one lock twist (Pic 9). We have made the second section of the body. The rest of the balloon is the sixth bubble. We can work in the same fashion to add many more sections of the body, though for our sculpture two sections should be enough.
.JPG)
Force the end of the balloon (the sixth bubble) half way through the loop of the fifth bubble and then through the loop of the second bubble (Pic 10). We have made the dragonfly body. The end of the balloon represents the tail. And the loop of the sixth bubble represents the head of the dragonfly.
.JPG)
The head looks better if we add eyes. Inflate white soft about three-inch bubble (Pic 11). Cut off the rest of the white balloon and tie off the end.
.JPG)
Lock both ends of the white bubble in one lock twist (Pic 12). We have made eyes.
.JPG)
Force and fix the eyes bubble inside of the loop of the sixth bubble. Also, you can lock the ends of the eyes bubble with the fourth blue bubble (Pic 13 and 14).
.JPG)
.JPG)
Inflate a (clear) balloon leaving about one-inch flat tail to make a set of wings in a shape of digit 8 (Pic 15).
.JPG)
Tie both ends of balloon to make a circle. Then split the balloon in two halves to make two bubbles of the same size and lock all end of both bubbles in one lock twist (Pic 16). We have made a set of wings. We have to make two sets of wings for the dragonfly.
.JPG)
Lock one set of wings with the fourth blue bubble. Lock the second set of wings with the first blue bubble. Use a permanent black marker to draw the face of the dragonfly (Pic 17 through 21). Congratulations, we have made the dragonfly. This is an example of the dragonfly sculpture with four balloons. Also, I want to point your attention that if we make the body with three sections, then we can attach the wings on the opposite sides of the body. In this scenario the bottom became the top of the body. You may want to attach three pairs of legs (lock each pair of legs with the same bubbles that we used to lock wings previously). And the wings can be attached with the additional flat balloons or with the legs balloons if you wish (simply tie the wings between the body sections).
.JPG)
.JPG)
.JPG)
.JPG)
.JPG)
.JPG)
In our next example we are going to make a caterpillar using basically the same body as we did previously. Inflate a balloon leaving about three-inch flat tail (Pic 22).
.JPG)
Make the body with three sections in the same fashion as we did previously (Pic 23).
.JPG)
Cut off the rest of the first green balloon and tie off the end. Inflate the second (yellow) balloon leaving about three-inch flat tail. Lock the nozzle of the yellow balloon with the last green bubble (Pic 24).
.JPG)
Keep working in the same fashion to make as many body sections as you want. In this example I have added three yellow body sections (Pic 25).
.JPG)
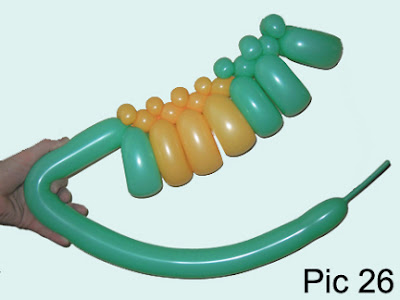
Cut off the rest of the yellow balloon and tie off the end. Attach the third (green) balloon and work it in the same fashion to add two more body sections (Pic 26 and 27).
.JPG)
.JPG)
In this example I have made total eight body sections. And then forced the rest of the last green balloon half way through the loops of the body section bubbles starting from the last bubble (Pic 27).
.JPG)
Make the eyes bubble and fix it in the same way as we did the head of the dragonfly (Pic 28). Congratulations, we have made the caterpillar. We can stop here. Keep the last green bubble as it is or make it shorter.
.JPG)
Also, we can make the head of the caterpillar on the other side of the body, where we have the tail at this moment. Let's twist the first bubble at the point where it protrudes from the body (Pic 29).
.JPG)
Split the first bubble on three bubbles. The first and the second bubbles should be of the same size (Pic 30).
.JPG)
And the third bubble we twist of about one-inch size at the very end of the balloon (Pic 31).
.JPG)
Lock both ends of the chain of the first and the second bubble in one lock twist (Pic 32).
.JPG)
Lock the first bubble of the first green balloon between the first and the second green bubbles of the last green balloon (Pic 33 through 36). We have made the head. It looks better with eyes. We can make eyes in a very simple way. Just twist two white about two-inch bubbles and lock them with the last bubble of the last green balloon.
.JPG)
.JPG)
.JPG)
.JPG)
Or let's make eye bubbles with antennas. Inflate about three-inch bubble (Pic 37). In this example I use an orange balloon.
.JPG)
Force the bubble in the middle section of the flat balloon (Pic 38). Make sure the flat ends are of the same size.
.JPG)
Split this bubble on half to make two eye bubbles of the same size (Pic 39).
.JPG)
Lock the eye-antennas bubbles with the last bubble of the last green balloon (Pic 40 through 45). Congratulations, we have made the caterpillar. In this example the caterpillar has two heads. Use a black permanent marker to draw the face or faces.
.JPG)
.JPG)
.JPG)
.JPG)
.JPG)
.JPG)
Caterpillars come in many variations: size, colors, shapes. So, let's make one more sculpture. This time we are going to use two balloons to make the body. And again, basically we are going to work in the same fashion. Inflate two balloons of different colors leaving about four-inch flat tails. Let's start with yellow balloon. Make the first body section (Pic 46).
.JPG)
Twist the first green soft about one-inch bubble. Lock both ends of the first green bubble in one lock twist. Lock the first green and the first yellow bubble in one lock twist (Pic 47).
.JPG)
Twist the third yellow one-inch bubble. Twist the fourth yellow soft one-inch bubble. Lock both ends of the fourth yellow bubble in one lock twist. Twist the second green one-inch bubble. Twist the third green soft one-inch bubble. Lock both ends of the third green bubble in one lock twist (Pic 48).
.JPG)
Lock the fourth yellow and the third green bubble in one lock twist (Pic 49).
.JPG)
Twist the fourth green about six-inch bubble. Lock both ends of the fourth green bubble in one lock twist. We have made the second section of the body. Work in this fashion the rest of the body. In this example I have made five body sections using different color for every other section (Pic 50 and 51). If you like you can add more balloons to make larger size body.
.JPG)
.JPG)
We can make the head in the same way as we did previously. Or better make some variations. In this example I twist the last green twelfth about six-inch bubble. Lock both ends of the twelfth green bubble in one lock twist. Cut off the rest of the green balloon. We have made the top part of the head or top lip. Twist the thirteenth yellow about six-inch bubble. Lock both ends of the thirteenth yellow bubble in one lock twist. We have made the bottom part of the head or the bottom lip. Force the rest of the yellow balloon half way through the loops of the body section bubbles. Make a pair of eye bubbles and lock them with the top of the head (Pic 52 through 55).
.JPG)
.JPG)
.JPG)
.JPG)
Once again, we can keep the tail as it is (Pic 56).
.JPG)
Or we can use it to make a head. In this example I make the eyes-antennas bubbles. Twist about one-inch bubble at the very end of the yellow balloon. Lock the eyes-antennas bubbles with the last yellow bubble. Use a permanent black marker to draw the face (Pic 57 through 60).
.JPG)
.JPG)
.JPG)
.JPG)
Sure, it takes a bit more time to make a two-headed caterpillar. However it's more fun to play with this kind of creation. We were playing role game with Eric, my three year old son, using two caterpillars (Pic 61) when he asked me to make it red. Eric wants to use red sculpture as Chuggington Wilson Train. I have made it using basically the same body just with some modifications. I think to put it in details in one of the future instructions. Though, after making caterpillar, you should figure it out without help. Try it.
.JPG)
Here I put all three sculptures together for better look (Pic 62).
Have fun and happy twisting :)
www.fewdoit.com
for you
You made my day! Thank you very much!
ReplyDeleteNicely presented information to this post, I prefered to read this kind of boom lift aluminium scaffolding. The quality of content is fine and the conclusion is good. Thanks for sharing valuable information.
ReplyDeleteYou are very welcome!
Delete