Buy balloons on Amazon (paid link):
Buy an air pump on Amazon (paid link):
Otherwise you make...BOOM! You need someone to help you to hold one end of the sculpture while you work on the other end of the sculpture. It prevents dragging balloons on the floor that may destroy balloons!
Supplies: balloons, an air pump and scissors.
In this example I am going to work in the same fashion as described in one of the previously published instructions. I am going to work with two sets of 3 balloons in each set. Inflate all balloons leaving about 8 cm flat tails.
Supplies: balloons, an air pump and scissors.
In this example I am going to work in the same fashion as described in one of the previously published instructions. I am going to work with two sets of 3 balloons in each set. Inflate all balloons leaving about 8 cm flat tails.
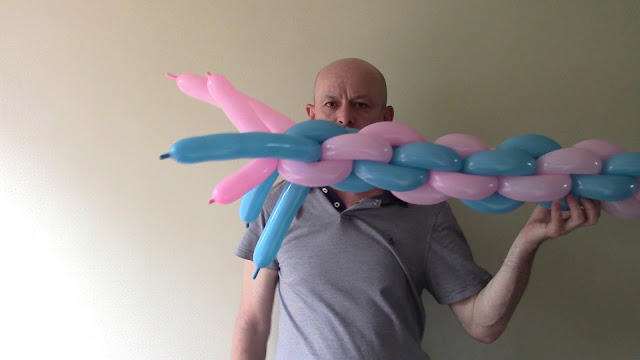
I want to make a variation of spiral color pattern. One set of balloons will have one blue and two pink balloons. And the other set will have one pink and two blue balloons. Tie nozzles of all balloons of one set in one knot.
Crisscross sets of balloons on top of each.
We are going to twist all bubbles of the same size. Fold balloons of the first set together and hold them in one hand about 15 cm away from the nozzles. Balloons of the second set should go between balloons of the first set.
We have to twist all bubbles moving in the same direction. And we have to alternate the colors to make the spiral color pattern. I alternate colors by moving the rest of the balloons to the spot of the nearest balloon. For example: I move the rest of the blue balloon of the first set to the pink bubble of the same set. All balloons should be moved in the same way. In one move twist and lock first bubbles of the first set. Fold the balloons of the second set and hold them in one hand at the spot where you are going to twist the bubbles.
In one move twist and lock bubbles of the second set. Remember to alternate colors! Keep working in this fashion following the same color pattern.
This color pattern incorporates straight lines with spiral making what I call spiral dashes.
We have to attach new set of the same color balloons (two pink and one blue) at the end.
Cut off the rest of the balloons of the first set and tie off the ends.
Twist and lock the last bubbles of the second set.
Attach a new set of the same colors (two blue and one pink) as the second set.
Cut off the rest of the second set of balloons and tie off the ends.
Keep working in the same fashion to make sculpture of desirable length.
It takes total of 4 sets (twelve balloons) to make about 1.5 meter long sculpture. It could make a nice sturdy pole or column.
As we make sculpture longer it makes harder to hold it in air. Bubbles may pop if you drag them on the floor. It is the time when you have to work with an assistant - someone to hold the end of the sculpture. In this example I work without assistant. I tied the end of the sculpture to the upper part of the window shade. The sculpture is safely suspended in the air while I work on the other end of the sculpture.
Work the rest of the sculpture in the same fashion following the same color pattern.
Once you made the pole of desirable length you can cut off the rest of balloons of the first set and tie off the ends. I have made about 7-8 meters long pole in this example.
Twist the last bubbles of the second set of balloons. We can decorate the ends of the sculpture in different ways. In this example I prepare small three petals flowers of blue color.
Attach one flower at each end of the sculpture. Cut off the rest of the balloons and tie off the ends.
Congratulations! We have made a very large balloon pole or balloon column.
Now, let's bring both ends of the pole down to the floor to make an arch. Avoid dragging the sculpture. For this matter, you better avoiding touching any objects at all.
I use a flat balloon to tie the top of the arch to the window shade. It helps to keep the arch in a proper shape. We can fix the sides of the ark in the same way using flat balloons or clear sticky tape/
Congratulations again! We have made a balloon arch!
Have fun and happy twisting :)


No comments:
Post a Comment