Buy balloons on Amazon (paid link):
Buy an air pump on Amazon (paid link):
I mentioned in previously published instruction “Arch 2 chain 2 hat 7” that we can use the same technique to work with sets of two and more balloons. So, in this instruction we are going to use sets of three balloons. I choose patriotic colors for this sculpture: blue, white and red. Each set of three balloons has all three colors. We are going to use about two dozens of balloons (eight balloons of each color) to make an arch. Inflate all balloons leaving about three-inch flat tails (Pic 1).
Tie nozzles of three balloons in one knot to make one set (Pic 2).
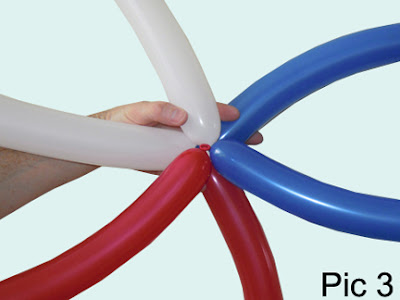
We need two sets of balloons to begin with. Crisscross both sets of balloons in one hand. Place the same color balloons next to each other (Pic 3). Obviously the set up, the first basic position of all balloons and all colors is very important for for all color patterns. The key position of colors is crucial when we want to mix different color patterns in one sculpture. We have to think about it in advance. In this example I place the second set of balloons to the right, clockwise.
Fold the first (bottom) set of balloons and hold it in one hand at the point where you want to twist first bubbles. We twist all bubbles of the same about 5-6 inch size (Pic 4).
We will use two color patterns to make the arch. Let's make straight line color pattern first. It means that each balloon stays next to the same color bubble. In our example after we twist bubbles we place
the blue balloon next to the blue bubble, the white balloon next to the white bubble and the red balloon next to the red bubble (Pic 5 and 6).
the blue balloon next to the blue bubble, the white balloon next to the white bubble and the red balloon next to the red bubble (Pic 5 and 6).
The next two sets of balloons we are going to twist with spiral color pattern. Make the third set of balloons (Pic 12).
Tie the third set to the end of our sculpture (Pic 13). We have to alternate colors in one direction to make the spiral pattern. The spiral pattern goes in the same direction as we started our sculpture, in our example it is clockwise. Place the new red balloon to the right (clockwise) to the red bubble. In our example it means we place the red balloon next to the blue bubble, the blue balloon next to the white bubble and the white balloon next to the red bubble.
Twist the last (sixth) bubbles of the second set (Pic 14).
Cut off the rest of the second set and tie the ends in one knot (Pic 15).
Make the fourth set of balloons and attach it to the end of our sculpture placing colors with spiral pattern (Pic 16).
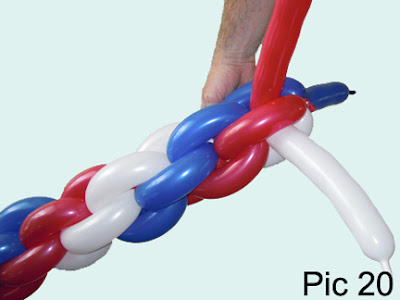
Twist bubbles and alternate colors in the same clockwise direction to the end of the balloons (Pic 17 through 20). We can twist bubbles in any direction we comfortable to. I twist bubbles to my right.
However we have to alternate the colors in the direction of the spiral goes. Why do I stress your attention so much on the directions? You can make two poles twisted in opposite directions. Then connect them in an arch or heart shape. Spirals twisted in opposite direction in this composition will make symmetrical design. We can create many different sculptures and decorations just by mixing different color patterns. Later, I will add some more examples of different color patterns, decorations, shapes to this post.
However we have to alternate the colors in the direction of the spiral goes. Why do I stress your attention so much on the directions? You can make two poles twisted in opposite directions. Then connect them in an arch or heart shape. Spirals twisted in opposite direction in this composition will make symmetrical design. We can create many different sculptures and decorations just by mixing different color patterns. Later, I will add some more examples of different color patterns, decorations, shapes to this post.
So far we made a pole (Pic 21). We can cut off and tie the ends of all balloons in one knot. We can make numbers of the same poles and connect them at the top to make an arch.
I am just going to add more balloons to this pole following the same color patterns but in opposite order. Add and twist two more sets of balloons with spiral pattern. Then add and twist two more sets of balloons with straight color pattern. Congratulations, we have made a small size arch (Pic 22). Obviously, we can add more balloons to make the arch much large.
This sculpture is flexible, so we can shape in different ways (Pic 23 and 24).
Working with large decorations or large size sculptures is all ways time consuming process. Working in a team is sure way to make more fun and have the job done faster. It's nice to have a professional balloon twister to get a little help. But, your assistant could be any one. The most help you need is to hold the ends of large sculpture while you work on the other end of the sculpture. Or to inflate balloons and so on and so forth. Also, there are many different commercial equipment available to make our work easier. I prefer to use only what is available in household to secure sculpture to walls and floor. Sewing thread and sticky tape do the work on the walls. Balloons filled with rise, salt or even water can be used to secure the sculpture to the floor.
Have fun and happy twisting :)
www.fewdoit.com
for you


No comments:
Post a Comment