

Buy balloons on Amazon (paid link):
Buy an air pump on Amazon (paid link):
Today we are going to make a number of scooters. Let's start with a very basic scooter. Inflate a balloon leaving about three-inch flat tail (Pic 1).

The first seven bubbles we twist to make the simple handlebar. Twist the first about three-inch bubble. Twist the second soft one-inch bubble (Pic 2).

Lock both ends of the second bubble in one lock twist (Pic 3).

Twist the third about five-inch bubble. Twist the fourth soft one-inch bubble (Pic 4).

Lock both ends of the fourth bubble in one lock twist (Pic 5).

Twist the fifth bubble of the same (about three-inch) size as the first bubble (Pic 6).

Lock both ends of the chain of the first five (the first through the fifth) bubbles in one lock twist (Pic 7).

Twist the sixth soft about two-inch bubble (Pic 8).

Lock both ends of the eighth bubble in one lock twist. The eighth bubble keeps the handlebar in a fixed position and represents the headlight. Twist the seventh about five-inch bubble (Pic 9). We have made the handlebar. We are going to use the same handlebar, with some minor differences in size of bubbles, to make all scooters presented in this instruction.

Squeeze the rest of the balloon to make it soft. Twist the eighth soft about four-inch bubble (Pic 10).

Lock both ends of the eighth bubble in one lock twist. It is the front wheel. We are going to use the rest of the balloon to make the foot-board and the rear wheel. We will twist four more bubbles. We can twist them in regular order. However, I think it is easier to do starting from the last bubble. So, let's twist the twelfth one-inch bubble at the very end of the balloon (Pic 11).

Lock the free end of the twelfth bubble with the eighth bubble (Pic 12).

Fold the rest of the balloon (the long bubble between the front wheel and the last bubble) in half. Twist in one move the rear wheel (the tenth bubble) and the foot-board (the ninth and the eleventh) bubbles (Pic 13).

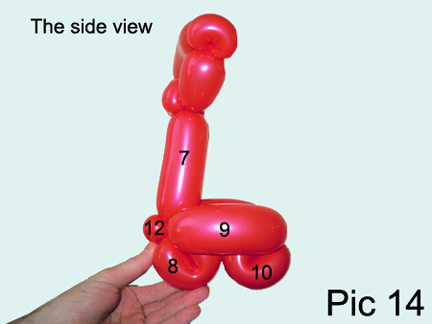
Force the wheels (the eighth and the tenth) bubbles half way between the foot-board (the ninth and the eleventh) bubbles (Pic 14 through 16).


Fix all bubbles in proper positions. Congratulations, you have made the simplest one balloon scooter (Pic 17).

There are many variations of scooters. As I have mentioned it before we are going to use the same handlebar as we have previously made (Pic 18). Squeeze the rest of the balloon to make it soft.

Twist the tenth one-inch bubble at the very end of the balloon. Split the rest of the balloon (the bubble between the handlebar and the tenth bubble) on two (the eighth and the ninth) bubble of the same size (Pic 19).

Lock both ends of the chain of two (the eighth and the ninth) bubbles in one lock twist (Pic 20). We have made the scooter without wheels. Use a different color balloon to make two wheels. To make a wheel I twist about five-inch bubble and lock both ends of the bubble in one lock twist.

Attach the wheels to the scooter (Pic 21 through 23). Congratulations, we have made the scooter.


For the next scooter we are going to add an extra bubble between wheels (Pic 24). I make it very soft and about one-inch shorter than the foot-board bubbles. The foot-board also has a very small bubble at the rear part.

Attach the wheels to the scooter (Pic 25 through 27). Also we can force the last blue bubble inside of the loop of the front wheel .


Congratulations again, we have made three scooters (Pic 28).

Now it is time to make a scooter with a sit. Again we are going to use the basic handlebar. Twist the eighth about four-inch bubble. Lock both ends of the eighth bubble in one lock twist (Pic 29).

Twist a chain of the next two (the ninth and the tenth) about four-inch bubbles (Pic 30).

Lock both ends of the chain of the last two (the ninth and the tenth) bubbles in one lock twist (Pic 31).

Cut off the rest of the balloon and tie off the end (Pic 32).

We have made the front part of the scooter (Pic 33 through 36).


Just for purpose of this instruction I am going to use a different color balloon to make the rear part of the scooter. Inflate the second balloon leaving about five-inch flat tail. Twist a chain of two (the first and the second) about five-inch bubbles (Pic 37).

Lock both ends of the chain of the first two (the first and the second) bubbles in one lock twist (Pic 38). We have made the first pair or section of the seat.

Twist the third one-inch bubble. Twist a chain of the next two (the fourth and the fifth) about five-inch bubbles (Pic 39).

Lock both ends of the chain of the last two (the fourth and the fifth) bubbles in one lock twist (Pic 40). We have made the second section of the seat.

Twist the sixth very soft about four-inch bubble (Pic 41).

Lock the free end of the sixth bubble between the fourth and the fifth bubble. We have made the top of the seat. Twist the seventh up to one-inch bubble (Pic 42).

Lock the free end of the seventh bubble between the first and the second bubble (Pic 43 and 44). We have made the rear part of the scooter.


Now we have to assemble the scooter (Pic 45).

Force the rest of the yellow balloon between the ninth and the tenth red bubbles (Pic 46).

You may use the rest of the yellow balloon to attach the scooter to a basic hat. Or cut off the rest of the yellow balloon and tie off the end (Pic 47 and 48). Though I would like to make the eighth about one-inch bubble at the bottom (Pic 53).


I use a black balloon to make wheels. Tie the balloon between the seventh and the eighth red bubble. Twist about sixth-inch bubble (Pic 49).

Lock both ends of the first black bubble in one lock twist. Cut off the rest of the black balloon. Force the eighth red bubble through the loop of the black bubble. Make the second wheel and force it between bubbles of the rear part (Pic 50 through 52). Also, we can force the rest of the black balloon all the way up through the rear part of the scooter to make a back of the sit or just to use it as a handle to hold the sculpture.


In this example you may notice that the rear part is not in the level with the front (Pic 52).

We need the eighth yellow bubble to keep both parts of the scooter in the level (pic 53). Congratulations, we have made the scooter with a sit.

Some scooters come with wind shield. We can make it with a clear balloon (Pic 54 through 56). Simply twist and attach a clear about five-inch bubble between the second and the fourth red bubbles.


We can make the seat higher by twisting one more section in the same fashion as we did previously (Pic 57). The way we have made the rear part of this scooter we can make many different sculptures, keep it in mind.

Congratulations again, we have made five scooters (Pic 58 and 59). Have fun and happy twisting :)

www.fewdoit.com
for you
No comments:
Post a Comment