Buy balloons on Amazon (paid link):
Buy an air pump on Amazon (paid link):
First we are going to make the base of the hat. Inflate the first green balloon leaving a two—inch flat tail (Pic 1).
Twist the first two—inch bubble (Pic 2).
Twist the 2nd soft one—inch bubble (Pic 3).
Lock both ends of the 2nd bubble in one lock twist (Pic 4). This step is marked with arrows between points B and C on the scheme 1.
Twist the third two—inch bubble (Pic 5).
Before you twist the fourth bubble you have to find the size of it. The chain of the first three bubbles and the fourth bubble should be long enough to make a loop around your head. So, loop the balloon around your head and measure the size of the 4th bubble. At this point you twist the 4th bubble (Pic 6).
Lock both ends of the chain of the first four (the first through the fourth) bubbles in one lock twist (Pic 7). This step is marked with arrows between points A and E on the scheme 1. We split he rest of the balloon on two bubbles of the same size and we keep a little flat tail.
Twist the fifth six—inch bubble (Pic 8).
Lock both ends of the chain of the last three (the third through the fifth) bubbles in one lock twist (Pic 9). This step is marked with arrows between points F and C on the scheme 1. The rest of the balloon is the sixth bubble.
Lock both ends of the chain of the last three (the fourth through the sixth) bubbles in one lock twist (Pic 10). This step is marked with red arrows between points G and D on the scheme 1. We have made the base of the hat.
Now we are going to make the jaw. Inflate the second green balloon leaving a four—inch flat tail (Pic 11).
Twist the first soft one—inch bubble (Pic 12).
Lock both ends of the first bubble in one lock twist (Pic 13). This step is marked with arrow between points A and B on the scheme 2.
Twist the 2nd ten—inch bubble (Pic 14).
Twist the third soft one—inch bubble (Pic 15).
Lock both ends of the 3rd bubble in one lock twist (Pic 16). This step is marked with arrows between points C and D on the scheme 2.
Twist the fourth soft four—inch bubble (Pic 17).
Lock both ends of the fourth bubble in one lock twist (Pic 18). This step is marked with arrows between points E and D on the scheme 2. We have made the first nostril.
Twist the fifth four—inch bubble (Pic 19).
Twist the sixth soft one—inch bubble (Pic 20).
Lock both ends of the 6th bubble in one lock twist (Pic 21).This step is marked with arrows between points F and G on the scheme 2.
Twist the 7th soft four—inch bubble (Pic 22).
Lock both ends of the seventh bubble in one lock twist (Pic 23). This step is marked with arrows between points H and G on the scheme 2. We have made the second nostril.
Twist the eighth ten—inch bubble (Pic 24).
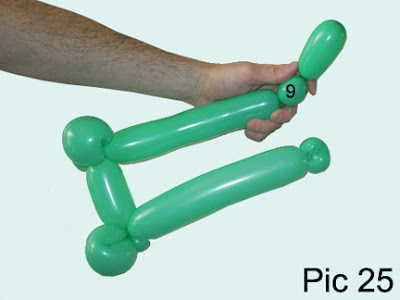
Twist the 9th soft one—inch bubble (Pic 25).
Lock both ends of the 9th bubble in one lock twist (Pic 26). This step is marked with arrows between points I and J on the scheme 2. The rest of the balloon is the tenth bubble.
Cut off the tenth bubble and tie off the end (Pic 27).
We have made the base of the hat and the jaw (Pic 28).
Now we have to attach the jaw to the base. Lock the first bubble of the second balloon with one of the ends of the fourth bubble of the first balloon. Then lock the ninth bubble of the second balloon with the other end of the fourth bubble of the first balloon (Pic 29 through 31).
Use a white balloon to make the eye bubbles and teeth. Inflate the white balloon leaving a five—inch flat tail (Pic 32).
Twist the first soft four—inch bubble (Pic 33).
Lock both ends of the first bubble in one lock twist (Pic 34). We have made one eye.
Twist the 2nd four—inch bubble (Pic 35).
Twist the third soft four—inch bubble (Pic 36).
Lock both ends of the third bubble in one lock twist (Pic 37). We have made the second eye.
We are going to attach the eye bubbles from the back of the hat. Force the first eye bubble half way through the loop of the 5th bubble of the first green balloon. Force the third white bubble half way through the loop of the 6th bubble of the first green balloon. Make sure the 2nd white bubble is located on the inner side of the hat (Pic 39 through 43). You also may pop the second white bubble. Use a permanent marker to draw the eyes.
Use the rest of the white balloon to twist the teeth bubbles and attach them to the jaw. I like to twist just the front teeth and then attach them between nostrils (Pic 44 through 46). Congratulations, you have made the hat!
Or you can use two white balloons to twist two rows of teeth. Attach one row of teeth on each side of the jaw (Pic 47 through 49). Have fun and happy twisting :)


Wow, thanks for sharing the steps to make it, going to try this out and hopefully kids at home will love it. Good post.
ReplyDeleteThank you!
DeleteYou are the coolest mom ever for doing it for your kids! Have fun and happy twisting :)