Buy balloons on Amazon (paid link):
Buy an air pump on Amazon (paid link):
Inflate the yellow balloon making a six—inch bubble (Pic 1).
Twist the first two—inch bubble (Pic 2). It’s the body of the bee.
Twist the 2nd soft one—inch bubble (Pic 3).
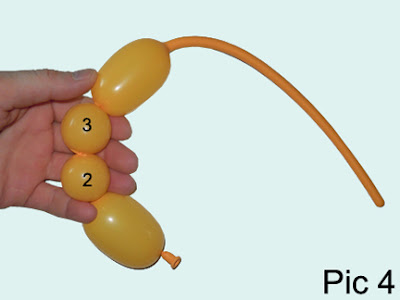
Twist the third soft one—inch bubble (Pic 4).
Lock both ends of the chain of the last two (the second and the third) bubbles in one lock twist (Pic 5). This step is marked with arrows between points A and C on the scheme.
Lock both ends of the 2nd (the third) bubble in one lock twist (Pic 6). This step is marked with arrows between points A and B on the scheme.The rest of the balloon is the 4th bubble.
Lock both ends of the fourth bubble in one lock twist (Pic 7). This step is marked with arrows between points C and D on the scheme. It’s the head of the bee. We made the bee without wings.
Use the long flat tail to make a bracelet. Just lock the ends of the flat tail in one lock twist between the body and the head bubbles of the bee (Pic 8 through 10). Make sure the bracelet is loose enough (easily fit two fingers between the bracelet and the arm)!
We can use a balloon to make two wings. Fill the black balloon with air (Pic 11).
Tie both ends of the black balloon in one knot (Pic 12).
Force the knot of the black balloon between the first and the second (third) yellow bubbles (Pic 13).
Find one half of the black balloon and force this point between the fourth and the second (third) yellow bubbles (Pic 14 through 16). Use a permanent marker to draw the face of the bee.
We have made the bee bracelet using just one balloon for the wings (Pic 17).
You can use two black balloons to make wings: one balloon per a wing. Fill two black balloons with air. Tie both ends of each black balloon in one knot. Lock the knot of the first black balloon around the third yellow bubble (Pic 18). We have made one wing.
Lock the knot of the 2nd black balloon around the second yellow bubble (Pic 19 and 20). We have made the second wing.
Use the permanent marker to draw the face and the body of the bee (Pic 21 through 23). Attention: make drawings only on the parts of a balloon that stays clear of human skin. On the pictures below you may see that I use the permanent marker to draw marks on the back of the bee only! The reason for it is that even the permanent marker smears off. Congratulations, you have made the bee bracelet. Have fun and happy twisting :)


No comments:
Post a Comment