

Buy balloons on Amazon (paid link):
Buy an air pump on Amazon (paid link):
Today we are going to make a doll house using a cube with sides six by six by six bubbles. We made cubes in previously published instructions "Cube" and "Fabric 3, Cube". This is not large size sculpture, however it can take a couple hours of work to twist more than 200 bubbles. So, please plan accordingly. Today we are going to work the sculpture using different patterns. And we will use different type of connections between sides of the cube. To make a better looking doll house you should probably use just one type of connection between walls. Though I want to show different ways, So, look through the instruction first and then choose type of connection to use for your doll house. We are going to twist all bubbles of about the same up to one-inch size. The cube has six sides. In our example each side of the cube has square shape with size six by six bubbles. In this example we are going to use two (or three) balloons to make each side of the cube. Lets start with the side that represents the floor. Inflate two brown balloons leaving about eight-inch flat tail (Pic 1).

Twist a chain of five (the first through the fifth) bubbles (Pic 2).

Lock both ends of the chain of the last four (the second through the fifth) bubbles in one lock twist (Pic 3). We have made the center of the square with two ends of the balloon outside of the square. This way we can use the rest of the balloon to make the second row of the square.

Twist the chain of the next three (the sixth through the eighth) bubbles (Pic 4).

Lock both ends of the chain of the last four (the fifth through the eighth) bubbles in one lock twist (Pic 5). You have to force the rest of the balloon through the loop of four (the second through the fifth) bubbles at the center.

Twist a chain of the next three (the ninth through the eleventh) bubbles (Pic 6).


Lock the chain of the last eight (the fourth through the eleventh) bubbles in one lock twist (Pic 7).

Twist a chain of the next three (the twelfth through the fourteenth) bubbles (Pic 8).

Lock both ends of the chain of the last twelve (the third through the fourteenth) bubbles in one lock twist (Pic 9).

Twist a chain of the next two (the fifteenth and the sixteenth) bubbles (Pic 10).

Lock both ends of the chain of the last sixteen (the first through the sixteenth) bubbles in one lock twist (Pic 11). We have made the second row of the square shape with sides four by four bubbles.

We can cut off the rest of the balloon at any time and use the second balloon to make the third row of the six by six bubbles square. In this example I can use the first balloon to make some part of the third row. Twist a chain of the next three (the seventeenth through the nineteenth) bubbles (Pic 12).

Lock both ends of the chain of the last four (the sixteenth through the nineteenth) bubbles in one lock twist. Twist a chain of the next two (the twentieth and the twenty first) bubbles (Pic 13).

Lock the free end of the twenty first bubble between the next two brown bubbles of the second row (Pic 14).

Twist a chain of the next three (the twenty second through the twenty fourth) bubbles (Pic 15).

Lock the free end of the twenty fourth bubble between the next two brown bubbles of the second row. Cut off the rest of the balloon and tie off the end (Pic 16). Tie double knot to secure the ends.

Attach the second brown balloon to the end of the first brown balloon. Work the rest of the third row in the same fashion (Pic 17 through 24).


Cut off the rest of the second brown balloon and tie off the ends. We have made the square with sides six by six bubbles (Pic 24). We can work in this fashion using more balloons to make even large size squares. In our example we are going to make all six sides of the cube of the same (six by six bubbles) size.

Now we are going to make the second side of the cube. And we will attach it at the same time to the first (brown) piece. For the second square piece I use different color balloons to represent a wall with a window. Inflate a clear color balloon leaving about eight-inch flat tail. Let's twist a chain of the first seven bubbles (Pic 25).

In the first example (with the brown piece) we work the first row at the center of the square and then we added the second and the third row. I found it's faster and easier for me to work two rows at the same time. Let's work it this way. Lock both ends of the chain of the last four (the fourth through the seventh) bubbles in one lock twist (Pic 26).

Twist a chain of the next three (the eighth through the tenth) bubbles (Pic 27).

Lock both ends of the chain of the last eight (the third through the tenth) bubbles in one lock twist (Pic 28).

Twist a chain of the next three ( the eleventh through the thirteenth) bubbles (Pic 29).

Lock both ends of the chain of the last twelve (the second through the thirteenth) bubbles in one lock twist (Pic 30).

Twist a chain of the next three (the fourteenth through the sixteenth) bubbles (Pic 31).

Lock both ends of the chain of the first sixteen (the first through the sixteenth) bubbles in one lock twist (Pic 32).

Lock both ends of the chain of the first four (the first through the fourth) bubbles in one lock twist. Cut off the rest of the balloon and tie off the ends (Pic 33). We have made the square piece with sides four by four bubbles. It represents the window.

In this example I use blue color balloon to make the third row of this square. Tie nuzzle of the blue balloon between a pair of clear bubbles at any corner. Work the third row around the square in the same fashion as we did it with the brown square. Twist a chain of the first three (the first through the third) blue bubbles (Pic 34)

Lock the free end of the third blue bubble between the nearest two clear bubbles around the same corner. Twist a chain of the next two blue bubbles (Pic 35).

Lock the free end of the fifth blue bubble between the nearest two clear bubbles. Twist a chain of the next three (the sixth through the ninth) blue bubbles (Pic 36).

Lock the free end of the ninth blue bubble between the nearest two clear bubbles (Pic 37).

Twist a chain of the next two (the ninth and the tenth) blue bubbles (Pic 38).

Lock the free end of the tenth blue bubble between the nearest two clear bubbles (Pic 39).

Remember, we have to connect square pieces to make a cube. Twist a chain of the next two (the eleventh and the twelfth) blue bubbles (Pic 40).

Each side of the square has three points where we are going to make connections between two square pieces. Lock the free end of the twelfth blue bubble at the corner between two brown bubbles of the first square piece (Pic 41). We have made the first connection.

Twist the thirteenth blue bubble (Pic 42).

Lock the free end of the thirteenth blue bubble between the nearest two clear bubbles (Pic 43).

Twist the fourteenth blue bubble (Pic 44).

Lock the free end of the fourteenth blue bubble between the nearest two brown bubbles. Twist the fifteenth blue bubble (Pic 45).

Lock the free end of the fifteenth blue bubble between the nearest two clear bubbles (Pic 46).

Twist the sixteenth blue bubble. Lock the free end of the sixteenth blue bubble between the nearest two brown bubbles (Pic 47). We have connected the first (brown) square with the second square. Yet, we have to finish the second square.


Twist a chain of the next two (the seventeenth and the eighteenth) blue bubbles (Pic 48).

Lock the free end of the eighteenth blue bubble between the nearest two clear bubbles (Pic 49).

Twist the next two (the nineteenth and the twentieth) blue bubbles. Lock both ends of the chain of the first twenty (the first through the twentieth) blue bubbles in one lock twist. Cut off the rest of the blue balloon and tie off the ends (Pic 50). We have made the second square piece and it is connected to the first (brown) piece. The two connected squares make a rectangular shape with sides six by twelve bubbles.

Now we are going to make the third square piece. It will represent the second wall with a window. We will connect the third square piece with the first two squares to make the corner of the cube. We worked the first two square pieces starting from the center of the square. We can make the square piece starting from the edge (the third row) of the square. Tie nuzzle of the balloon between two brown bubbles at the middle of the long side of the rectangular shape. Twist a chain of the first two bubbles (Pic 51).

Lock the free end of the second bubble between the nearest two brown bubbles at the corner next to the second square (Pic 52).

Twist the third bubble (Pic 53).

Lock the free end of the third bubble between the nearest two blue bubbles (Pic 54). We have made the first corner of the cube.

Twist a chain of the next two (the third and the fourth) bubbles (Pic 55).

Lock the free end of the fifth bubble between the nearest two blue bubbles (Pic 56).

Twist a chain of the next two (the sixth and the seventh) bubbles (Pic 57).

Lock the free end of the seventh bubble between the nearest two blue bubbles (Pic 58). Once again, we are making a square shape with sides six by six bubbles. It takes total of thirty six bubbles to make the square piece. And it takes twenty bubbles to make the edge (the third row) of the square. So far we have made seven bubbles of the edge.

Twist a chain of the next eleven (the eighth through the eighteenth) bubbles. Lock the free end of the eighteenth bubble between the two brown bubbles at the other corner of the cube (Pic 59).

Twist a chain of the next two (the nineteenth and the twentieth) bubbles (Pic 60).

Lock both ends of the chain of the first twenty (the first through the twentieth) bubbles in one lock twist. Cut off the rest of the balloon and tie off the ends. We have made the edge (the third row) of the third square. And it is attached to the first two square pieces (Pic 61 and 63).


We are going to use the second balloon of the same color to twist the second row of the third square. It takes twelve bubbles to make the second row. Tie nozzle of the second balloon between two bubbles at the corner. Twist a chain of the first two bubbles (Pic 63).

Lock the free end of the second bubble between the nearest two bubbles (Pic 64).

Twist the third bubble (Pic 65).

Skip one bubble and lock the free end of the third bubble between the next two bubbles (Pic 66). We have made the corner of the second row.

Work the rest of the second row in the same fashion (two bubbles for the side and one bubble for the corner). Twist a chain of the next two (the fourth and the fifth) bubbles (Pic 67).

Lock the free end of the fifth bubble between the nearest two bubbles (Pic 68).

Twist the sixth bubble (Pic 69).

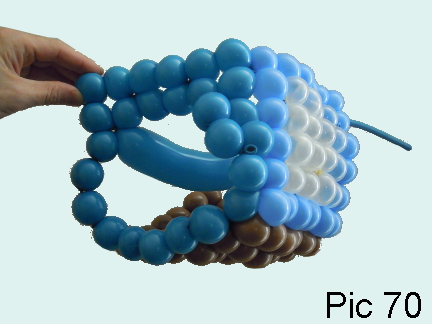
Skip one bubble and lock the free end of the sixth bubble between the next two bubbles (Pic 70). We have made the second corner of the second row.
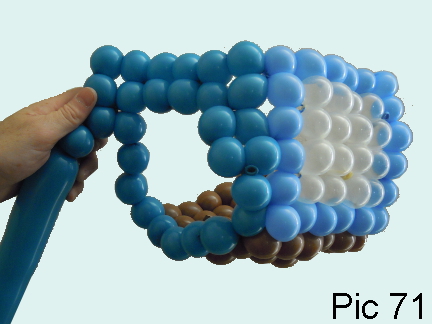
Twist a chain of the next two (the seventh and the eighth) bubbles (Pic 71).
Lock the free end of the eighth bubble between the nearest two bubbles (Pic 72).

Twist the ninth bubble (Pic 73).

Skip the next bubble and lock the free end of the ninth bubble between the next two bubbles (Pic 74). We have made the third corner of the second row.

Twist a chain of the next two (the tenth and the eleventh) bubbles. Lock the free end of the eleventh bubble between the nearest two bubbles (Pic 75).

Twist the twelfth bubble (Pic 76).

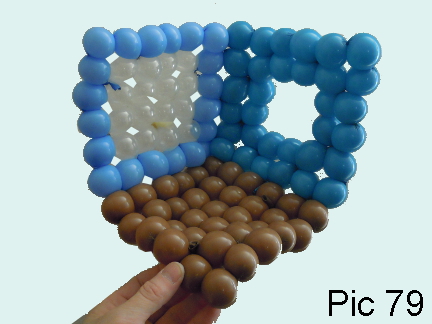
Lock both ends of the chain of the first twelve (the first through the twelfth) bubbles in one lock twist. Cut off the rest of the balloon and tie off the ends (Pic 77 through 79). We have made the third and the second row of the third square piece.


Use clear color balloon to make the window (the first row of the square). We can attach the window to the wall at all four points or just to one point. If we attach the window just to one point then we would be able to open the window. Twist a chain of four bubbles. Make the bubbles slightly bigger size than we twist for the walls. Lock both ends of the chain of the first four (the first through the fourth) bubbles in one lock twist. Cut off the rest of the balloon and tie off the ends (Pic 80).

Tie the window to the wall (Pic 81 and 82).


I use dark blue balloon to make the fourth side of the cube. Once again, let's work this piece starting from the edge of the square. Twist the first bubble. Lock the free end of the first dark blue bubble in the middle between two brown bubbles at the edge of the brown square. Twist a chain of the next two (the third and the fourth) dark blue bubbles. Lock the free end of the third bubble between the nearest two brown bubbles at the corner of the cube. I want to use different type of connection between walls this time. Twist a chain of the next two (the fourth and the fifth) dark blue bubbles (Pic 83).

Lock both ends of the fifth dark blue bubble in one lock twist (Pic 84). We have made connection bubble. We are going to use three connection bubbles between walls. So, it takes twenty six bubbles to make the edge (the third row) of this square.

Twist a chain of the next three (the sixth through the eighth) dark blue bubbles (Pic 85).

Lock both ends of the eighth dark blue bubble in one lock twist (Pic 86). We have made the second connection bubble.

Twist a chain of the next three (the ninth through the eleventh) dark blue bubbles. Lock both ends of the eleventh dark blue bubble in one lock twist (Pic 87). We have made the third connection bubble.

Force each connection bubble between nearest blue bubbles. We have connected the dark blue side to the blue side of the cube (Pic 88).

Twist a chain of the next seven (the twelfth through the eighteenth) dark blue bubbles. Lock both ends of the eighteenth dark blue bubble in one lock twist (Pic 89). We have made the fourth connection bubble. Work the rest of the balloon in the same fashion.

Twist a chain of the next three (the nineteenth through the twenty first) bubbles. Lock both ends of the twenty first bubble in one lock twist. We have made the fifth connection bubble. Twist a chain of the next three (the twenty second through the twenty fourth) bubbles. Lock both ends of the twenty fourth bubble in one lock twist. We have made the sixth connection bubble (Pic 90).

Cut off the rest of the balloon. Tie off the end. Attach the second dark blue balloon (Pic 91).

Twist the twenty fifth bubble. Lock the free end of the twenty fifth dark blue bubble between the two brown bubble at the corner (Pic 92).

Twist the twenty sixth dark blue bubble. Lock both ends of the chain of the first twenty sixth dark blue bubbles in one lock twist. We have made the edge of the square. Work the second row of the dark blue square in the same fashion as we did the third blue square piece. It take total of twelve bubbles to make the second row. Two bubbles for each side and one bubble for each corner (Pic 93 through 96). Cut off the rest of the balloon and tie off the ends.


I use yellow balloon to make the fifth side of the cube. It will represent the wall with a door. Attach nozzle of the yellow balloon between two brown bubbles at the corner (Pic 97).

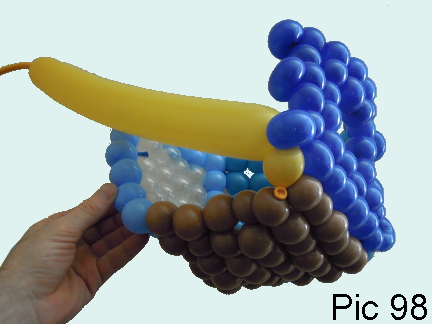
Twist the first yellow bubble. Lock the free end of the first yellow bubble with dark blue connection bubble (Pic 98). We have made the corner of the cube.
Twist a chain of the next two (the second and the third) yellow bubbles. Lock the free end of the third yellow bubbles with the next dark blue connection bubble. Twist a chain of the next two (the fourth and the fifth) yellow bubbles. Lock the free end of the fifth yellow bubble with the next dark blue connection bubble (Pic 99).

Twist a chain of the next six (the sixth through the eleventh) yellow bubbles. Lock the free end of the eleventh yellow bubble between two blue bubbles at the top corner of the wall (the second side of our cube). Twist the next two (the twelfth and the thirteenth) yellow bubbles. Lock the free end of the thirteenth yellow bubble between the next two blue bubbles. Twist a chain of the next two (the fourteenth and the fifteenth) yellow bubbles. Lock the free end of the fifteenth yellow bubble between the next two blue bubbles at the corner. Twist the sixteenth yellow bubble. Lock the free end of the sixteenth yellow bubble between the two brown bubbles at the corner (Pic 100).

Now we are going to work the second row in the opposite direction. Twist the next two (the seventeenth and the eighteenth) yellow bubbles. Lock both ends of the chain of the last four (the fifteenth through the eighteenth) yellow bubbles in one lock twist. Twist the next two (nineteenth and the twentieth) yellow bubbles. Lock both ends of the chain of the last eight (the thirteenth through the twentieth) yellow bubbles in one lock twist. Twist the twenty first yellow bubble. It is the corner bubble. Lock both ends of the chain of the last twelve (the tenth through the twenty first) bubbles in one lock twist. Work in this fashion the rest of the yellow wall. The hole inside of the yellow wall reserved for the door (Pic 101).

We have made the fifth side of the cube (Pic 102 through 106).


I use brown balloon to make the door. The door presented by rectangle with sides eight by two bubbles. I am going to attach one side of the door to the wall at two points. Twist the door bubbles slightly bigger size than we twist bubbles for the wall. Twist the first brown bubble. Lock the free end of the first brown bubble between two yellow bubbles. Twist a chain of the next three (the second through the fourth) brown bubbles. Lock both ends of the chain of the first four (the first through the fourth) bubbles in one lock twist (Pic 107).

Twist the fifth brown bubble. Lock the free end of the fifth brown bubble between the next two yellow bubbles. Twist a chain of the next three (the sixth through the eighth) brown bubbles. Lock both ends of the chain of the first eight (the first through the eighth) bubbles in one lock twist. Cut off the rest of the balloon and tie off the ends (Pic 108 and 109). We have made the door.


I use red balloons to make the sixth side of the cube. It will represent the roof of the house. This time I want to make the square piece with three connection bubbles on each side of the square. So, it takes total of forty eight bubbles to make this piece. I work this square in the same fashion as we did the first (brown) piece, just remember to add connection bubbles at the edges (Pic 110).

Attach the sixth (red) square to the cube by forcing the connection bubbles between appropriate pairs of bubbles of each wall (Pic 111 through 114).


Congratulations, we have made the cube. We already can use it as a doll house (Pic 114). In this example the dollhouse is large enough for super heroes action toys. Also, working in this fashion we can make building adding five square pieces for each additional floor.

The flat roof is OK. However triangular shape roof stands better against rain :) and it looks better then flat roof. As I mentioned in previously published instruction "Cube", we can fold the cube to make a roof. In this example I fold over one week old cube to make the triangular shape roof (Pic 115 and 116). We can use flat balloons to attach the roof to the house.


It makes more sense and it is faster to make triangular roof using just half of the cube though. Let's make two connected square pieces to make a rectangular shape with sides six by twelve bubbles. We can work the rectangle in the same fashion as we did in the instruction "Cube" using six balloons. Also, I want to add connection bubbles on long sides of the rectangle. And add three connection bubble at the top of the roof to reinforce the corner (Pic 117 through 120).


Make triangular shape for the front (rear) of the roof. In this example I use blue balloon to make the edge and the second row working in the same fashion as we did the yellow wall for the house (Pic 121). It takes twenty bubbles to make this piece.

And then I use clear balloon to make the rest part of the triangular piece. It takes seven clear bubbles in this example (Pic 122 and 123).


Attach the triangular piece to the front of the roof using the connection bubble on the edge of the roof (Pic 124 through 127).


Attach the roof to the house using connection bubbles of the red (six) side of the cube. Congratulations again, we have made the doll house (Pic 128 through 137). We can use balloons inflated with helium to suspend the doll house in the air. We can put small format book flat on the floor inside of the doll house to help balance the sculpture. Have fun and happy twisting :)


www.fewdoit.com
for you
No comments:
Post a Comment