

Buy balloons on Amazon (paid link):
Buy an air pump on Amazon (paid link):
This instruction is a continuation of the previously published “Fabric 2 Cake 2 Crown 2” instruction. We made a square piece of fabric (6 by 6 bubbles) in the previous instruction and used it to make a cake. Today we are going to use basically the same square piece to make a cube. If you find it’s hard to follow me here with the first 6 balloons, then you may want to check the before mentioned “Fabric 2 cake 2 crown 2” instruction (where I use different color balloons to make the same sculpture). I think the cube is a very basic sculpture. Often, it is the simplest part or the base for other sculptures. We can use it as an example of what and how we can make more complicated sculptures. So, we will use the same size squares to make the cube. The cube has 6 sides. We are going to use 6 balloons to make every two sides of the cube. We use a total of 18 balloons to make this cube. We use each balloon to twist twelve bubbles. We twist 36 bubbles to make one square side. It takes a total of 216 bubbles to make this cube. It will take more than 20 minutes to make it. Inflate all balloons leaving about seven—inch flat tails (Pic 1).

First of all, we have to make three pairs of balloons by tying the ends of each pair in one knot (Pic 2).

We are going to twist all bubbles of the about the same one—inch size.Take two pairs of balloons. Twist the first bubble in each pair (Pic 3).

Lock the free ends of the first bubbles in one lock twist (Pic 4).

Twist the first bubble of the third balloon, and twist the first bubble in the next pair of balloons (Pic 5).

Lock the free ends of first bubbles in one lock twist (Pic 6).

Use a balloon on the left side of the sculpture to twist a chain of two first bubbles. And use the next balloon to twist the second bubble (Pic 7).

Lock the free ends of the second bubbles in one lock twist (Pic 8).

Use the two balloons in the middle of the sculpture to twist the second bubbles (Pic 9).

Lock the free ends of the second bubbles in one lock twist (Pic 10).

Use a balloon on the right side of the sculpture to twist a chain of two first bubbles. And use the next balloon to twist the second bubble (Pic 11).

Lock the free ends of the second bubbles in one lock twist (Pic 12). We have made the first two rows of the square. We have made a pattern. We are going to follow this pattern to make the rest of the sculpture.

We have to twist six rows to make the square piece (Pic 13). It’s the first side of the cube.

Then we twist six more rows to make the second side of the cube (Pic 14).

Cut off the rest of the balloons and tie off the ends (Pic 15).

We can use different color balloons to make color patterns. It makes our sculpture more attractive. We attach the other sides of the cube in the process of making them to already made sides. It is actually simpler than it sounds. First I want to make a corner of the cube. Make a pair of pink and yellow balloons. Attach it to the long edge of the blue sides between the seventh and the eighth blue bubbles (Pic 16). It would make no difference if we attach it between the fifth and sixth bubbles or on the opposite edge.

Twist the first yellow bubble (Pic 17).

Lock the free end of the first yellow bubble between the sixth and the fifth blue bubbles (Pic 18). We have just made the first corner of the cube.

Make the next purple pair of balloons. Attach it between the ninth and the tenth blue bubbles (Pic 19).

Twist the first purple and the first pink bubbles. Lock the free end of the first purple and the free end of the first pink bubble in one lock twist (Pic 20).

Make the next yellow and pink pair of balloons. Attach it between the eleventh and the twelfth blue bubbles. Twist the first pink and the first purple bubbles (Pic 21). We can alternate balloons to make different color patterns.

Lock the free end of the first pink bubble with the free end of the first purple bubble in one lock twist (Pic 22).

Twist the chain of the first two yellow bubbles and the second purple bubble (Pic 23).

Lock the free end of the second yellow bubble with the free end of the second purple bubble in one lock twist (Pic 24).

Twist the second pink bubbles (Pic 25).

Lock the free ends of the second pink bubbles in one lock twist (Pic 26).

Twist the second purple and the second yellow bubbles (Pic 27).

Lock the free end of the second purple bubble with the free end of the second yellow bubble in one lock twist (Pic 28). We have made the first two rows of the third side of the cube.

Twist the third purple bubble (Pic 29).

Lock the free end of the third purple bubble between the third and the fourth blue bubbles (Pic 30).

Twist the third yellow and the third pink bubbles (Pic 31).

We will keep working in the same fashion as described above. Do it in whichever color pattern you like (Pic 32 and 36).


We have made four sides of the cube. It looks like a sit of armchair. There are only two edges where we can attach the next set of balloons: one is on the back of the sit and the second is the edge on the front of the the sit (Pic 37). We attach balloons and work in the same fashion as described above. Do it in whichever color pattern you like.

I attach the new sets of balloons to the back of the sit (Pic 38 through 43).


Make the last two sides of the cube and attach them to the other sides of the cube at the same time (Pic 44 through 46).


We can use the cube as a hidden place for gifts (nothing sharp or heavy). You can place the gift inside of the cube before you tie all sides together. We have to tie the ends of the last side to the nearest (light blue) side of the cube (Pic 47 and 48).


Congratulations, we have made the cube (Pic 49 through 51).


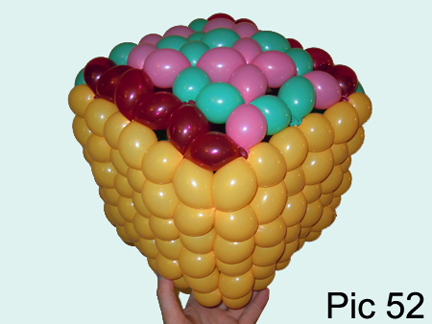
There are many different color patterns we can make (Pic 52 through 56).


Children of all ages love to play with cubes. We can use this sculpture to play number of games. Try to use the cube instead of a ball (Pic 57).

I use this sculpture to make toy furniture. It could be a table (Pic 58).

It could be a roof for a doll house or an armchair (Pic 59 and 61).


I want to stress your attention on the different ways we attach sides. In the previous instruction we use extra bubbles to attach the sides to the square piece of the fabric. We can use the same or similar technique to make cubes. This way the cube will have sharp edges. It is also easier to attach sides to each other or even add new parts to make large sculptures. I think you can manage to make this cube without my help. You have to add extra bubbles around edges of the cube (Pic 62 through 85).


Here you can see how different the cubes edges come (Pic 86 and 87). There are many uses for sharp edges. For example we can use this technique to make doll houses and etc. That's going to be in one of the next posts.

I always try to make sculptures using the least possible number of balloons. So, is there way to make this cube with fewer balloons? Sure. But the cube is going to be smaller size. We can use six balloons to make three side (eighteen bubbles) of the cube (Pic 88). I will provide detailed instruction for this cube as well in future posts.
Have fun and happy twisting :)

www.fewdoit.com
for you
No comments:
Post a Comment