

Buy balloons on Amazon (paid link):
Buy an air pump on Amazon (paid link):


Inflate a yellow balloon leaving a five—inch flat tail (Pic 1).

Twist the first soft one—inch bubble (Pic 2).

The next three bubbles you twist in the bird body fold to make the base of the head. Twist the second three—inch bubble (Pic 3).

Twist the third three—inch bubble (Pic 4).

Lock both ends of the chain of the last two (the second and the third) bubbles in one lock twist (Pic 5). This step is marked with arrows between points B and D on the scheme.

Twist the fourth three—inch bubble (Pic 6).

Lock the free end of the fourth bubble between the second and third bubbles (Pic 7). This step is marked with arrows between points C and E on the scheme.

Twist the fifth four—inch bubble (Pic 8).

Lock both ends of the fifth bubble in one lock twist ({Pic 9). This step is marked with arrows between points E and F on the scheme.

Twist the sixth four—inch bubble (Pic 10).

Lock both ends of the sixth bubble in one lock twist (Pic 11). This step is marked with arrows between points F and G on the scheme 2.

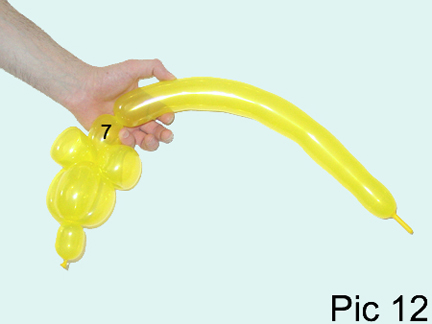
Twist the 7th two—inch bubble (Pic 12). It’s the neck.
The next five bubbles you twist in the pop up twist to make the arms/wings. Twist the eighth three—inch bubble (Pic 13).

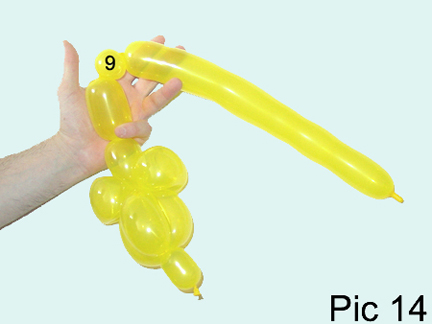
Twist the ninth soft one—inch bubble (Pic 14).
Twist the tenth one—inch bubble (Pic 15). You are going to pop the tenth bubble.

Twist the eleventh soft one—inch bubble (Pic 16).

Twist the twelfth three—inch bubble (Pic 17).

Lock both ends of the chain of the last five (the eighth through the twelfth) bubbles in one lock twist (Pic 18). This step is marked with arrows between points H and M on the scheme.

Lock both ends of the ninth bubble in one lock twist (Pic 19). This step is marked with arrows between points J and I on the scheme.

Lock both ends of the eleventh bubble in one lock twist (Pic 20). This step is marked with arrows between points K and L on the scheme.

Inflate the white balloon to make the eyes (Pic 21).

Lock the nozzle of the white balloon between the head and the neck bubbles (Pic 22).

Twist the first three—inch bubble (Pic 23).

Lock the free end of the first bubble of the white balloon with the first bubble of the yellow balloon (Pic 24).

Twist the second three—inch bubble (Pic 25).

Lock the free end of the second bubble between the neck and the head (Pic 26).

Cut off the rest of the white balloon and tie off the end. Lock both ends of the first bubble of the yellow balloon in one lock twist (Pic 27). This step is marked with arrows between points A and B on the scheme.

Use an orange or a red color balloon to make the beak. Inflate and tie off a soft two—inch bubble (Pic 28). Cut off the rest of the balloon.

Lock one or both ends of the beak bubble between the neck and the head (Pic 29 and 30). You have made the beak.

Pop up the tenth bubble of the first yellow balloon (Pic 30 and 31). You have made the arms/wings.


Twist the thirteenth three—inch bubble (Pic 32). It’s the body. The rest of the balloon is the fourteenth bubble. It’s the tail. You may attach the chicken to any hat.

Or you may make the legs and attach them between the body and the tail. Lock the leg bubbles between the tail and the body bubbles of the chicken (Pic 33 and 34). Use the permanent marker to draw the eyes.


Congratulations, you have made the chicken (Pic 35 and 36). Have fun and happy twisting :)

www.fewdoit.com
for you
No comments:
Post a Comment