Buy balloons on Amazon (paid link):
Buy an air pump on Amazon (paid link):
Youtube user william41222 asked me to make sunflower balloon. There are many different ways to make sunflower sculpture. Today we are going to make a sunflower hat using caterpillar body described in previously published instruction Dragonfly, Caterpillar In this example, I inflated yellow balloon leaving about four-inch flat tail. Twist the first about one-inch bubble. It is a connection bubble. Twist the second about seven-inch bubble. Lock both ends of the second bubble in one lock twist. We have made one section. The second bubble represents petal. Work the rest of the sculpture in the same fashion, twisting petals of the same size. In this example I have made four sections/ petals (Pic 1). We can twist different size petals: from one-inch and up to the entire length of fully inflated balloon.
Twist as many petals/ sections as it takes to make the hat. In this example I used total of four balloons to make 14 petals/ sections. Then I lock the first bubble of the first balloon with the last bubble of the last balloon (Pic 2). Congratulations, we have made the sunflower hat.
One has to wear the hat to make it look good (Pic 3 and 4). Fix all bubbles in proper positions. In some of the future instructions we are going to use this sunflower hat to make sunflower. We will use a number of black balloons to make the center of the flower. Also, you may check links to other online balloon twisting online resources for ideas and designs. I remember seen some very interesting designs by theAmatour.
Children are flowers of life :)
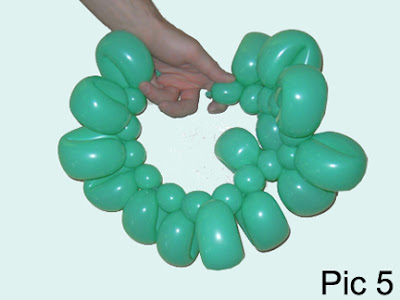
In the next example we are going to use green hat as a base for the pumpkin hat (Pic 5). You have to make even number of leaves/ sections. In this example I have made fourteen sections with slightly smaller (about six-inch) size long bubbles.
For purpose of this instruction we are going to use total of five orange bubbles to make pumpkin. Inflate orange balloons leaving about one-inch flat tail (Pic 6).
We are going to split each orange balloon on three bubbles of the same size. Lock the nozzle of the orange balloon with leaf (green) bubble. Twist the first orange bubble (Pic 7).
Twist the second orange bubble of the same size as the first orange bubble. Lock the free end of the second orange bubble with the next leaf (green) bubble. Cut off nicely the rest of the orange balloon and tie off the end to make the third orange bubble of the same size (Pic 8).
Lock one end of the third orange bubble with the next leaf. Lock the other end of the third orange bubble between the first and the second orange bubble (Pic 9). So, we attach one end of each orange bubble to one of leaves. And the other end of each orange bubble locked with all other orange bubbles.
Work the rest of the sculpture in this fashion. We have to look all fourteenth orange bubbles in one lock twist at the top of the pumpkin. Move every other orange bubble inside of the pumpkin (Pic 10 through 13). Congratulations, we have made the pumpkin hat.
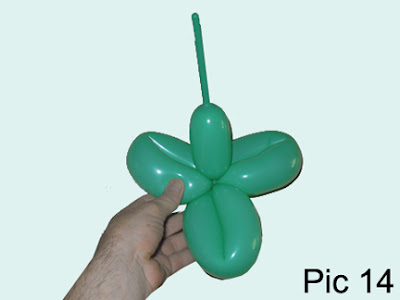
The pumpkin hat looks better with leaves on the top. Inflate green balloon leaving about six-inch flat tail. Twist three about seven-inch bubbles. Make sure to leave the fourth about three-inch bubble at the end of the balloon. Lock all ends of the three first bubbles in one lock twist (Pic 14).
Attach the three leaves at the top of the pumpkin. Split the fourth bubble on two bubbles to make the funny tail (Pic 15 through 17). Congratulations, we have made the pumpkin. We can use each orange balloon to make large size bubbles: up to length of fully inflated balloon. Also, we can attach orange bubbles to every other leaf instead of every leaf.
There is another variation of the hat. In this example I again used four yellow balloons to twist fourteen about seven-inch large bubbles. Inflate black balloon leaving about three-inch flat tail. Force the black balloon through loops of all yellow bubbles (one at a time). While making hats with smaller size bubbles, I noticed that it easier for me to pull the flat end than the nuzzle end of the balloon through the loops (Pic 18).
Lock the nozzle of the black balloon with the black balloon at the point where they meet (Pic 19).
Cut off the rest of the black balloon and tie off the end (Pic 20).
Hide the connection of the black balloon inside of the nearest yellow bubble (Pic 21 and 22). Congratulations, we have made another variation of sunflower hat.
Working in the same fashion we can use different colors and different size bubbles to make many different flowers. Use white and yellow balloons to make a daisy hat (Pic 24 and 25).
And here I put together all the sculptures that we have made today (Pic 26).


No comments:
Post a Comment