Buy balloons on Amazon (paid link):
Buy an air pump on Amazon (paid link):
Inflate a white balloon leaving a six—inch flat tail (Pic 1).
We’re going to twist 18 bubbles. Make all bubbles soft and of the same (up to two-inch) size. Twist the first bubble (Pic 2).
Twist the second bubble (Pic 3).
Lock both ends of the chain of the first two (the first and the second) bubbles in one lock twist (Pic 4). This step is marked with arrows between points A and C on the scheme.
Lock both ends of the first (and the second) bubble in one lock twist (Pic 5). This step is marked with arrows between points A and B on the scheme.
Twist the third bubble (Pic 6).
Twist the fourth bubble (Pic 7).
Twist the fifth bubble (Pic 8).
Lock both ends of the chain of the last two bubbles in one lock twist (Pic 9). This step is marked with arrows between points D and F on the scheme.
Lock both ends of the fourth (and fifth) bubble in one lock twist (Pic 10). This step is marked with arrows between points D and E on the scheme.
Twist the sixth bubble (Pic 11).
Twist the seventh bubble (Pic 12).
Twist the eighth bubble (Pic 13).
Lock both ends of the chain of the last two (the seventh and the eighth) bubble in one lock twist (Pic 14). This step is marked with arrows between points G and I on the scheme.
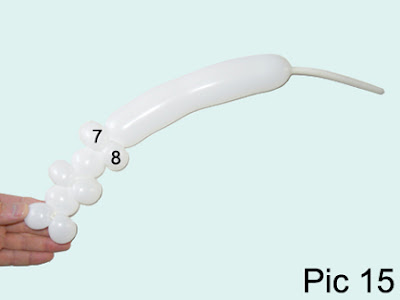
Lock both ends of the 7th (and the 8th) bubble in one lock twist (Pic 15). This step is marked with arrows between points G and H on the scheme.
Twist the ninth bubble (Pic 16).
Twist the tenth bubble (Pic 17).
Twist the eleventh bubble (Pic 18).
Lock both ends of the chain of the last two (the tenth and the eleventh) bubbles in one lock twist (Pic 19). This step is marked with arrows between points J and L on the scheme.
Lock both ends of the tenth (and eleventh) bubble in one lock twist (Pic 20). This step is marked with arrows between points J and K on the scheme.
Twist the twelfth bubble (Pic 21).
Twist the thirteenth bubble (Pic 22).
Twist the fourteenth bubble (Pic 23).
Lock both ends of the chain of the last two (the thirteenth and the fourteenth) bubbles in one lock twist (Pic 24). This step is marked with arrows between points M and O on the scheme.
Lock both ends of the thirteenth (and the fourteenth) bubble in one lock twist (Pic 25). This step is marked with arrows between points M and N on the scheme.
Twist the fifteenth bubble (Pic 26).
Twist the sixteenth bubble (Pic 27).
Twist the seventeenth bubble (Pic 28).
Lock both ends of the chain of the last two (the sixteenth and the seventeenth) bubbles in one lock twist (Pic 29). This step is marked with arrows between points P and R on the scheme.
Lock both ends of the sixteenth (and the seventeenth) bubble in one lock twist (Pic 30). This step is marked with arrows between points P and Q on the scheme.
Twist the eighteenth bubble (Pic 31).
Lock both ends of the chain of the first eighteenth (the firth through the eighteenth) bubbles in one lock twist (Pic 32). This step is marked with arrows between points S and B on the scheme. The rest of the balloon is the nineteenth bubble.
Cut off the nineteenth bubble and tie off the end (Pic 33). Fix all bubbles into proper positions.
We use two bubbles to make each skull. And we use one bubble to connect each two skulls. You may make a bracelet with different number of skulls. Inflate a balloon making two—inch bubble (Pic 36).
Lock both ends of the balloon in one lock twist (Pic 40 and 41). Just make sure the bracelet is loose enough to pull your hand through it.
Cut off the rest of the flat tail or just hide it behind the bubbles. There are two ways you can arrange the bottom bubble of the skull. You can fix it symmetrically to the top bubble (Pic 42 and 43).
Or you can fix the bottom bubble perpendicularly to the top bubble (Pic 44 and 45). Use the permanent marker to draw the skull. Congratulations, you have made one skull bracelet. Have fun and happy twisting :)


No comments:
Post a Comment