
Materials: balloons, scissors, air pump and permanent marker
Today we are going to make flags. We can use this fabric to make very large size sculptures of very different shapes. Always, before we start work on large size sculpture, you have to make sure that you have enough balloons, enough time to work on the sculpture and enough space to make the sculpture. For our first sculpture I will use three colors (red, blue and yellow) to make the rows. Also, I will use different color balloons to connect the rows between each other. However, the sculpture looks much better if you use just one color (clear will do) balloons for the connections. I use different color connection balloons just for purpose of this instruction. Inflate all balloons for the rows leaving about three-inch flat tail (Pic 1). We are going to make two red rows, two blue rows and three yellow rows.

Tie nozzles of two red balloons to make a pair (pic 2). We are going to use a pair of balloons to make each row.

The size of the sculpture depends greatly on the size of the bubbles. In this example we are going to twist bubbles for the rows of the same about six-inch size. Hold two balloons together. Twist the first bubbles of both balloons and lock the free ends of the first bubbles at the same time in one move (Pic 3).

Inflate all balloons to connect the rows leaving about eight-inch flat tail (Pic 4). In this example I use gray or clear color balloons as connectors between rows.

For purpose of this instruction, I will attach the connection balloon to the left side of our sculpture later. So, let's lock the nuzzle of the first gray balloon with the first red bubbles (Pic 5). Work in this fashion to make three bubbles in the row.

Twist the second red bubbles. Lock the nozzle of the second gray balloon with the second red bubbles (Pic 6).

Twist the third red bubbles. Lock the nozzle of the third gray balloon with the third red bubbles (Pic 6).

At the end of each row we twist the last (fourth) bubbles half size of the bubbles that we made the row of. In our example it is about three-inch (Pic 8).

Lock the nozzle of the fourth (here I use clear color) balloon with the fourth red bubbles (Pic 9). Please note: due to the background, the clear balloon may appear white or gray on pictures. We have made the first row. So, our flag is going to be four bubbles long.

Now, we are going to work on the second row. Tie nozzles of the next pair of red balloons. We can work rows from any side. Just for purpose of this instruction I will work all rows from the same (left) side of the sculpture. So, let's twist the first bubbles of the second row (Pic 10).

In this example I am going to use different (pink) color balloons as connectors between rows. Lock the nozzle of the first (pink) balloon with the first red bubbles of the second row (Pic 11). From here we can twist the second row in the same fashion as we did the first row. Then we have to attach the second row on the top of the first row.

Twist the second red bubbles of the second row (Pic 12).

We attach rows to each other by forcing the connection balloons through the corresponding loops of the second row. Force the first gray connection balloon through the loop of the second bubbles of the second row (Pic 13).

Twist the rest of the second row in the same fashion (Pic 14). Also we can, and I think it is easier, place the connection balloon between the row balloons before you twist the bubbles. Also, we have to lock the free end of the last bubbles of the second row with the clear connection balloon that we use to lock the last bubbles of the first row.

We are going to use this balloon to connect all rows on the right side of the sculpture. We twist all bubbles of the same about one-inch size. Twist the first bubble of the last clear connection balloon (Pic 15).

Lock the free end of the first clear bubble with the last red bubbles of the second row (Pic 16). We have made the second row and connected it to the first row.

Use the blue balloons to make the next two rows. Place the first (pink) connection balloon between blue balloons and twist the first blue bubbles (Pic 17).

Make sure to fix the second row balloons as close to the first row balloons as you can. Just pull them close together. Twist the first gray about two-inch bubble of the nearest connection balloon (Pic 18). The spot where we twist this bubble is just in level (or slightly above) with the top edge of the red balloons. We have made the connection bubble. We twist all connection bubbles of the same size.

Lock the free ends of the first blue bubbles with the free end of the first gray bubble (Pic 19).

Work in this fashion to the end of the row. We place the pink connection balloons inside of the loop of the corresponding blue bubbles. And we lock the ends of blue bubbles with the corresponding connection (gray) bubbles (Pic 20 through 22). Also, once we make the row we cut off the rest of row balloons and tie off the ends.


Make the fourth row in the same fashion. The only difference is that we place the gray connection balloons between blue bubbles and lock the ends of the blue bubbles with the corresponding connection (pink) bubbles (Pic 23).

Use the yellow balloons to make the next three rows. Also, for this size sculpture ,we can use just one balloon for making each row. It helps to save balloons. Though it takes more time to make the row. Work one side of the row from the beginning to the end (Pic 24 through 26). For this row we lock the free ends of the yellow bubbles (odd row) with corresponding connection (gray) bubbles.


Then work the second side of the row from the end to the beginning (Pic 27).

Tie off the ends and cut off the rest of the yellow balloon (Pic 28).

Make two more yellow rows (Pic 29). We have made total of seven rows.

Cut off the rest of the connection balloons and tie off the ends (Pic 30).

I purposely did not connect rows on the left side of the sculpture. This way we can use this side of the sculpture to connect to another piece of fabric and etc. Let's attach our sculpture for the flagpole. Actually this sculpture is relatively heavy for one balloon flagpole. Nevertheless, let's use a brown balloon to connect rows in the same fashion as we did it on the right side. Just start from the top of the sculpture (Pic 31 and 32). Congratulations, we have made flag of Columbia.


If you don't need the flagpole, you can simply cut off the rest of the brown balloon and tie off the end (Pic 33).

OK. For the next example we are going to use green, white and orange balloons for the rows and clear balloons to make connections between rows. I want to make smaller size sculpture. So, I am going to twist about four-inch bubbles for the rows. And I will use one balloon to make each row. Also, I want to make the connection bubbles on the side of the sculpture of the same colors as the rows. For this reason I will connect rows on the sides of the sculpture using the row balloons. Let's start with the green balloon. Twist a chain of eight bubbles. Twist the fourth and the fifth bubble of about two-inch size. Make sure to have about two-inch bubble at the end of the balloon (Pic 34).

Lock both ends of the chain of the first eight bubbles in one lock twist. Then use clear color connection balloons to lock pairs of green bubbles (Pic 35). We have made the first row.

Use another green balloon to twist a chain of eight bubbles as you did for the first row. Lock both ends of the chain of the first eight bubbles in one lock twist. Twist the ninth one-inch bubble (Pic 36).

Lock the free end of the ninth bubble of the second green balloon between the fourth and the fifth bubbles of the first green balloon (Pic 37).

Place connection clear balloons (one at a time) between bubbles of the second green balloon and lock the ends of the corresponding green bubbles. Twist the ninth one-inch bubble of the first green balloon and lock it between the fourth and the fifth bubbles of the second green balloon (Pic 38). We have made the second row and it is connected to the first row.

Cut off the rest of the green balloons and tie off the ends (Pic 39).

Lock the bubbles of the second row with nozzles of the connection clear balloons (Pic 40).

Use white balloons to make the next two rows. Lock the nozzle of the first white balloon at the side of the sculpture between the fourth and the fifth bubbles of the second row. Twist the first white one-inch bubble (Pic 41).

Work one side of the third row from the beginning to the end of the row (Pic 42).

Then work the second side of this row from the end to the beginning (Pic 43).

Twist the first bubble of the second white balloon. Lock the free end of the first bubble of the second white balloon between the fourth and the fifth white bubbles of the first white balloon (Pic 44).

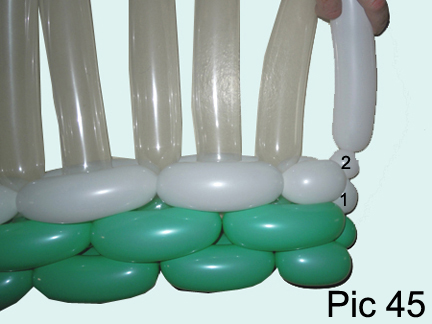
Lock the nozzle of the second white balloon between green bubbles of the second row (Pic 45).
Work the second white balloon to make the second row (pic 46 and 47)


Use orange balloons to make the next two rows. Attach the nozzle of the orange balloon on the side between white bubbles. Cut off the rest of the white balloon and tie off the end (Pic 48).

Work the orange balloon to make the row. Use the white balloon on the right side of the sculpture to make the connection between row. Cut off the rest of the white balloon and tie off the end (Pic 49 and 50).


Attach the nozzle of second orange balloon between the orange bubbles of the first orange balloon on the right side of the sculpture. Twist the first one-inch bubble of the second orange balloon (Pic 51).

Work the last orange row in the same fashion as we did previously (Pic 52). Use the end of the first orange balloon to make the connection between the two orange rows on the left side of the sculpture.

Cut off the rest of all balloons and tie off the ends (Pic 53).

In this example I used blue permanent marker to draw a sign to make it look more like flag of India (Pic 54).

As you can see the difference in the size of row bubbles makes big difference on the size of large sculptures (Pic 55).

So far we have used two sets of connection balloons. Also, we can use just one set of connection balloons to make the same fabric (Pic 56 and 57). It makes difference. This way we use less balloons. It takes less time to make the sculpture.

However, it comes with price: there will be small but visible holes in the fabric and you have to make odd number of rows (pic 58). In this example I twisted five bubbles long rows to make the flag of Israel.

Congratulations, we have made three flags (Pic 59). We can use combinations of different color balloons to make in the same fashion many more flags. I am going to add more pictures of flags to this post as I make them. This kind of fabric is one of the most popular for making large and very large sculptures: houses, cars, bodies and etc. We will talk some more about this fabric in future instructions. Have fun and happy twisting :)

Flag of Bahrain.
I think it would be better for full resemblance with the flag to add two more rows for this sculpture. In this example I use a pair of white balloons to make two rows (make one row, cut off nicely ends of balloons-keep them inflated, then use the same balloons to make the second row). I use five white balloons and nine red connection balloons.

Flag of Benin.
In this example I used one set of connection balloons in sculpture that has even (eight) rows.

I have to use flat ends of the connection balloons to attach the top row.
.JPG)
Flag of China.
In this example I used water based paint to draw (three times) stars in the left corner of the flag.

.JPG)
Flags of Morocco.
In this example I used a permanent green marker to draw the star. The green comes very dark on the red background.

In this example I used a permanent green marker to draw the star. The green comes very dark on the red background.

www.fewdoit.com
for you
No comments:
Post a Comment