Buy balloons on Amazon (paid link):
Buy an air pump on Amazon (paid link):
We are going to make two sculptures of hedgehog. The sculptures will look almost the same. The only noticeable difference is in the way we make the nose. In the following example we are going to us tulip twist to attach the nose bubble. Inflate black very soft about one-inch bubble. Tie both ends of the bubble in one knot. Cut off the rest of the balloon leaving at least two-inch flat tail (Pic 1). We have prepared the nose bubble.
Inflate brown balloon leaving about eight-inch flat tail (Pic 2).
There are slightly different ways to make the tulip twist. We described how to make tulip twist in some previously published instructions. Twist brown soft about thumb size bubble. I am going to use it to make the tulip twist. Lock the free end of the brown bubble with the flat tail of the black (nose) bubble. Make sure to leave at least one-inch flat tail between bubbles. Force the small brown bubble about two-inch inside of the balloon. Make sure the black bubble stays outside. Twist the first about two-inch brown bubble (Pic 3 through 5). We have made the tulip twist and the black (nose bubbles is attached to the brown balloon.
Twist the second about one-inch bubble. Twist the third soft about one-inch bubble (Pic 6).
Lock both ends of the third bubble in one lock twist (Pic 7).
Twist the fourth about two-inch bubble (Pic 8).
Lock both ends of the chain of the last three (the second through the fourth) bubble in one lock twist (Pic 9). We have made the head.
Twist the fifth about one-inch bubble. Twist the sixth soft about one-inch bubble (Pic 10).
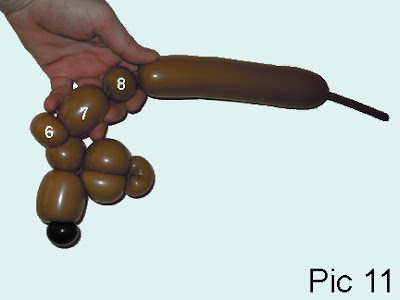
Lock both ends of the sixth bubble in one lock twist. We have made the front leg. Twist the seventh about two-inch bubble. Twist the eighth soft about one-inch bubble (Pic 11).
Lock both ends of the eighth bubble in one lock twist. We have made the rear leg. Twist the ninth about one-inch bubble. Twist the tenth about one-inch bubble. Twist the eleventh soft about one-inch bubble (Pic 12).
Lock both ends of the eleventh bubble on one lock twist. We have made the other rear leg. Twist the twelfth about two-inch bubble. Twist the thirteenth soft about one-inch bubble (Pic 13).
Lock both ends of the thirteenth bubble in one lock twist. We have made the other front leg. Twist the fourteenth about one-inch bubble (Pic 14).
Lock both ends of the chain of the last ten (the fifth through the fourteenth) bubble in one lock twist (Pic 15).
Twist the fifteenth about three-inch bubble. Make sure to keep at least one-inch bubble at the end of the balloon (Pic 16).
Lock the free end of the fifteenth bubble between the ninth and the tenth bubbles. The rest of the balloon is the sixteenth bubble. The sixteenth bubble represents the tail. We have made the hedgehog body with head, legs and belly (Pic 17 through 20). We can use the same body to make sculpture of different animals, for example turtles.
Hedgehogs comes in different colors in the nature. And so we can use different colors balloons to make the sculptures. Pink, yellow, brown, black, gray, blue (for Sonic hedgehog cartoon character) and etc. I choose brown color for the body and gray for the top of my hedgehog. We can work the top of the sculpture in different ways to make different shapes. I rather use just one balloon for the top. Inflate gray balloon leaving about eight-inch flat tail. Tie the nuzzle of the gray balloon at the base of the tail (the sixteenth brown) bubble (Pic 21).
We are going to twist all (twenty two) gray bubbles of the same about one-inch size. Twist the first gray bubble (Pic 22).
Lock the free end of the first gray bubble with the rear (eleventh brown) leg bubble (Pic 23).
Twist the next two (the 2nd and the 3rd) gray bubbles (Pic 24).
Lock the free end of the 3rd gray bubble with the nearest front leg (the 13th brown) bubble (Pic 25).
Twist the next two (the fourth and the fifth) gray bubbles (Pic 26).
Lock the free end of the fifth gray bubble with the third brown bubble (Pic 27). Work in this fashion around the body to make the first row of gray bubbles.
Twist the next 2 (the 6th and the 7th) gray bubbles (Pic 28).
Lock the free end of the 7th gray bubble with the nearest front leg- it is the thirteenth brown bubble (Pic 29).
Twist the next two (the eighth and the ninth) gray bubbles (Pic 30).
Lock the free end of the ninth gray bubble with the nearest rear leg, it is the eleventh brown bubble (Pic 31).
Twist the tenth gray bubble (Pic 32).
Lock the free end of the tenth gray bubble with the tail bubble. We also, lock both ends of the chain of the first ten (the first through the tenth gray bubbles in one lock twist (Pic 33 through 36). We have made the first gray row.
Twist the next three (the 11th through the 13th) gray bubbles (Pic 37).
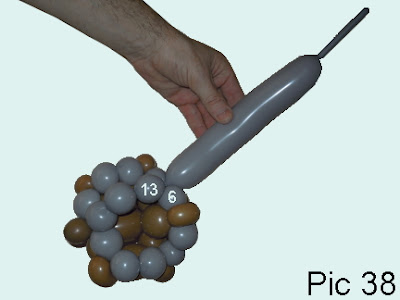
Lock both ends of the chain of the last seven (the seventh through the thirteenth) bubbles in one lock twist. You have to pull the rest of the gray balloon through the loop between the sixth and the seventh gray bubbles (Pic 38).
Twist the next three (the 14th through the 16th) gray bubbles (Pic 39).
Lock both ends of the chain of the last sixth (the eleventh through the sixteenth) gray bubbles in one lock twist (Pic 40).
Twist the next three (the 17th through the 19th) gray bubbles (Pic 41).
Lock both ends of the chain of the last fifteen (the fifth through the nineteenth) gray bubbles in one lock twist. You have to pull the rest of the gray balloon through the loop between the fourth and the fifth gray bubbles (Pic 42).
Twist the twentieth gray bubble (Pic 43).
Lock both ends of the chain of the last six (the 15th through the 20th) gray bubbles in one lock twist (Pic 44).
Twist the next two (the twenty first and the twenty second) gray bubbles (Pic 45).
Lock the free end of the twenty second gray bubble with the tail (the sixteenth) brown bubble (Pic 46). The rest of the gray balloon is the twenty third bubble. We can keep it to represent the tail. Or we can cut it off and tie off the end. Or we can hide it inside of the body.
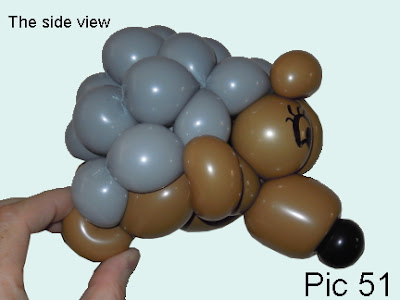
I rather hide the twenty third gray bubble inside of the body. Simply force the twenty third bubble inside between the other gray bubbles. Use permanent black marker to draw the eyes and the mouth. Congratulations, we have made the hedgehog (Pic 47 through 52). Once again, I want to remind you that we can twist gray bubbles of different sizes to make the top of different shape, though it may take more than one gray balloon.
And here is the second sculpture of hedgehog with different nose bubble (Pic 53). In this example, instead of attaching the black (nose) bubble using tulip twist, I use the first brown bubble to represent the nose bubble. It eliminates the need to make the tulip twist. Follow this steps. Twist the first brown soft about one-inch bubble. Lock both ends of the first brown bubble in one lock twist. Twist the second about two-inch brown bubble. Work the rest of the sculpture in the same fashion as described above for the first sculpture. Use permanent black marker to paint the nose.
Congratulations again, we have made two hedgehogs (Pic 54 and 55).


No comments:
Post a Comment