Buy balloons on Amazon (paid link):
Buy an air pump on Amazon (paid link):
First we are going to make a handle using the same twisting technique described in previously published instructions "How to make balloon dreadlocks", " Caterpillar to butterfly" and some others. Inflate a balloon (clear, white or gray colors looks good to me) making about 22 - 25 cm long bubble (Pic 1).
Trim off nozzle of the balloon (Pic 2).
We are going to twist all bubbles of the same about 2.5 cm (Pic 3).
Force the first bubble about 3 - 4 cm inside of the balloon (Pic 4).
Twist the second bubble (Pic 5).
Work the rest of the balloon in the same fashion (Pic 6).
Normally I twist total of seven bubbles for the handle. I force six bubbles inside of the balloon and the seventh bubble remains outside (Pic 7). It is possible to make total of eight bubbles out of one balloon. However, you will have to make smaller size bubbles and yet, there is good chance the rest part of the balloon may pop at the next step. If you really want to make longer size handle then better attach another balloon in the same way as described in instruction " How to make dreadlocks from balloons".
Cut a little hole at nipple (the round tip) end of the balloon (Pic 8).
Slowly deflate the rest part of the balloon (Pic 9). We have made the caterpillar body. The first six bubbles covered in extra layer - it makes them indestructible. It is virtually impossible to pop them even if you squeeze them very hard! I love this kind of bubbles :)
Lock both ends of the sixth bubble in one lock twist (Pic 10).
Lock both ends of the fifth bubble in one lock twist (Pic 11). We have made the handle. It feels nicely when you hold it and you can give it the strongest hand grip!
Now we have to make the blade. Fully inflate a balloon of appropriate color. I use red balloon in this example (Pic 12). Normally I make the blade of about 2/3 or 3/5 length of a fully inflated balloon. Measure the blade starting from the nipple (round) end of the balloon. You have to make the blade bubble as firm as possible. The firmer, the better! Force air inside of the blade bubble and then twist the bubble.
Cut off the rest of the balloon. Attach the blade between the last three bubbles of the handle (Pic 13). Congratulations! We have made balloon lightsaber.
Blue, green, purple and red are the most popular colors for this sculpture. It feels very nice to hold. You can use it as a balloon lightsaber, a balloon saber, a balloon sword and so on (Pic 14 and 15).
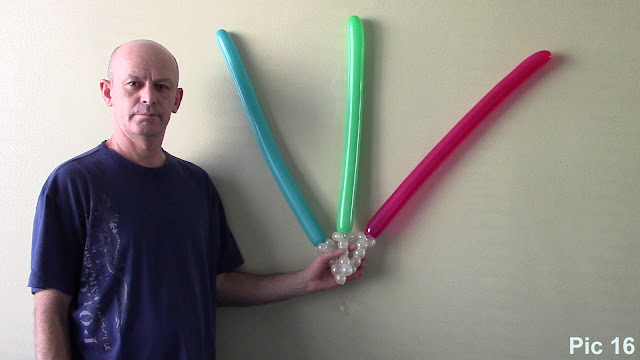
I made very strong impression on my kid with this lightsaber using the Real Force! Yeah, it is very well known trick, nevertheless you can repeat it over and over again. Balloons easily get charged by static electricity. For example, you can rub the blade of a balloon lightsaber frequently (without squeezing it) for 5 - 10 seconds to get it charged with static strong enough, so you can hang the sculpture on the wall (Pic 16 and 17)! The static also, will lift up long hair on your head - unfortunately, long time ago in a galaxy far far away, I lost my ability to demonstrate this effect ;)
Anyway, static is electricity - electricity is a power - power is a force - The Force!!
Have fun and may the Force be with you! :))


No comments:
Post a Comment